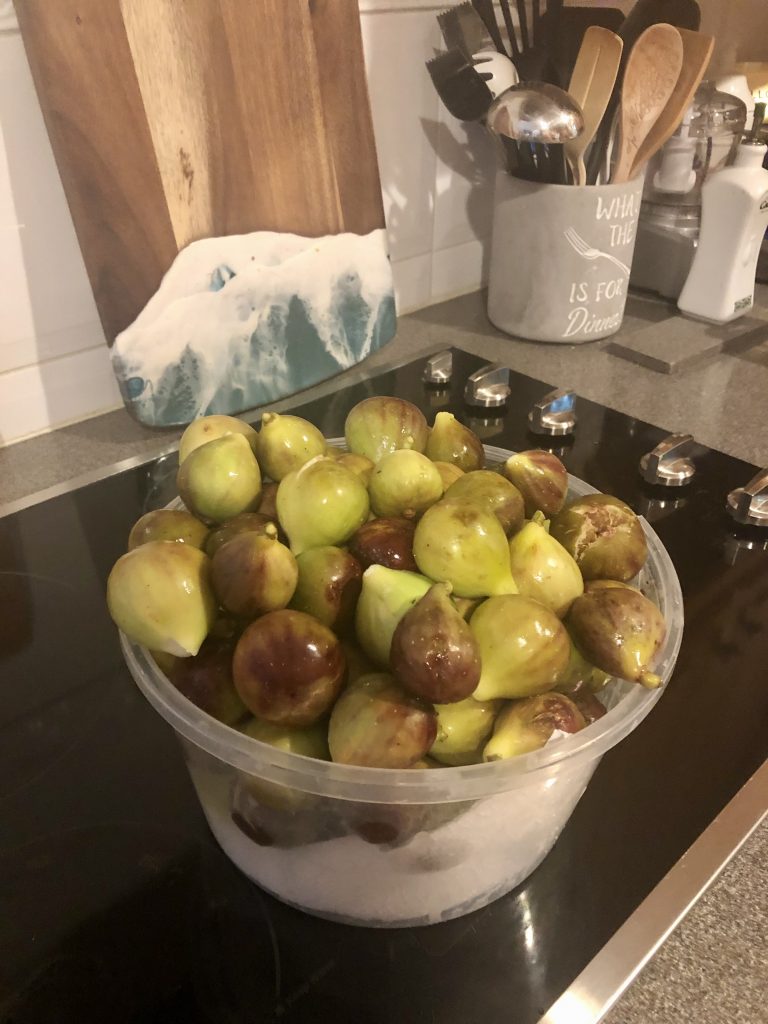
To say that my fig tree has been in overdrive is an understatement. I have had this tree for 21 years. That’s how long I have lived in this house. My love for figs started many years ago in Bethany Beach where there were fig trees around the area. I knew where they were and I would pick some here or there. Once I took that first bite I could not believe how delicious it tasted. Totally different from a Fig Newton.
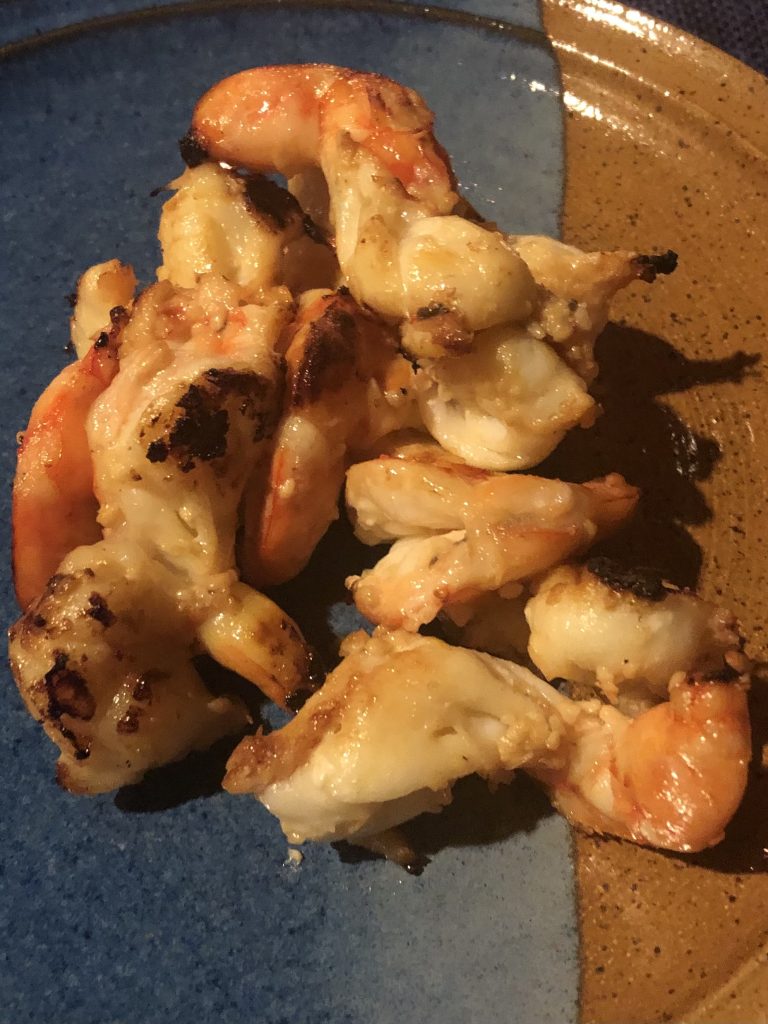
My fig tree has gone through the ups and downs through the years. Just like anything else. Last year we had a mild winter so the tree is like on steroids. I have given them to my Italian friends and neighbors. I have made a stuffed pork loin, jam, which I had never made before, an up side down fig cake, a regular fig cake and last night’s choice was a salad with Prosciutto accompanied by marinated jumbo shrimp (olive oil, garlic, herbs, salt and pepper) from Big Fish in Rehoboth Beach. We grilled them and they tasted like little lobsters.
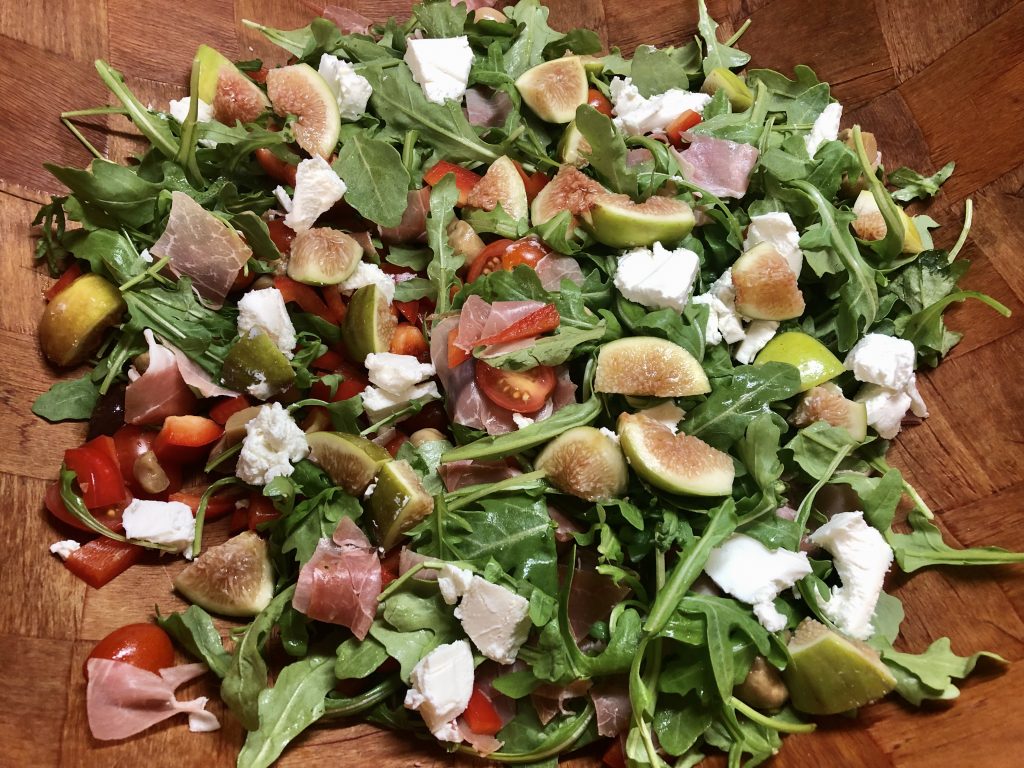
As I organized the salad I got some arugula, grape tomatoes, spicy marinated black olives, marinated mushrooms and some white beans from Fresh Market. A red pepper chopped, goat cheese, and I cut the figs and prosciutto in bite size pieces. Simple, right? No exact measurements are necessary. You need enough of these ingredients so you can have all of them on your fork when you take that first taste of the salad.
Dressing:
2 cloves of garlic, minced
1 teaspoon of dried oregano
1/2 teaspoon Dijon mustard
1/4 cup good red wine vinegar
1 teaspoon kosher salt
1/2 teaspoon freshly ground black pepper
1/2 cup good olive oil
Put all ingredients in a jar and shake. Now, that’s easy!! My go to dressing at the moment. It tastes that good.
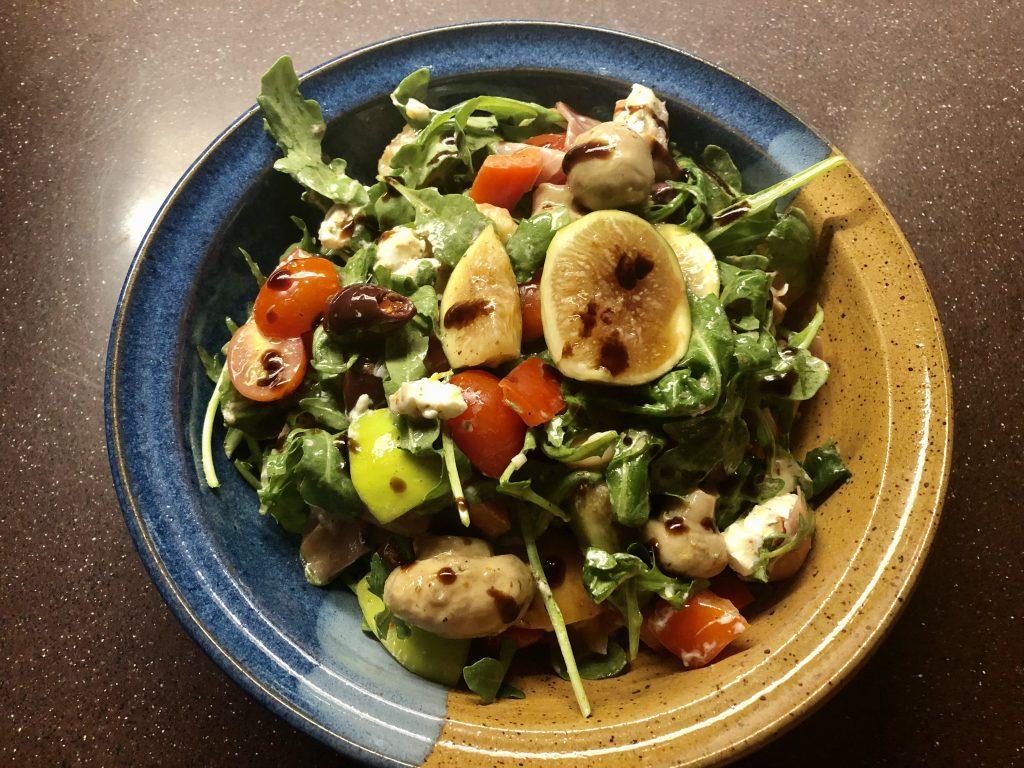
Dress your salad, serve it and make sure you garnish it with a couple of the figs. I went the extra step of drizzling a bit of balsamic glaze.
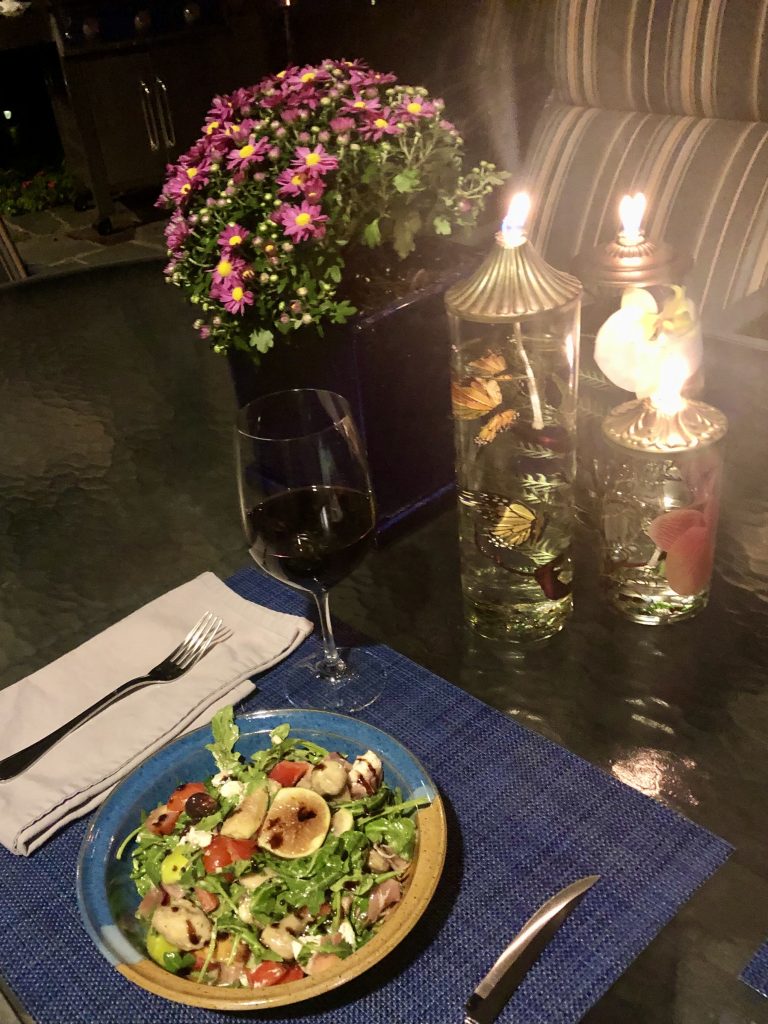
We enjoyed the salad as a first course. And then grilled the shrimp. They only take a couple of minutes
There is a hint of fall in the air, the leaves are yet not turning. It is the perfect time to eat outdoors; the food taste better. That’s my take on it.
AboutMyBeaches has a Facebook page. Check it out. Have a beautiful day.
Comments Off on Figs, Salad, Recipe, Shrimp, Delaware Beaches
It is formed into large blocks, and aged in brine. Its flavor is tangy and salty. It ranges from mild to sharp. I am talking about Feta Cheese.
A friend sent me a recipe that she had not made but a friend had and fell in love with it. It is a baked Feta pasta. I made it last night. Never knew that Feta could melt this way.
I made the recipe just like it was supposed to be made. It is probably going to be my summer go to recipe. Very easy.
Check this out: BAKE FETA PASTA
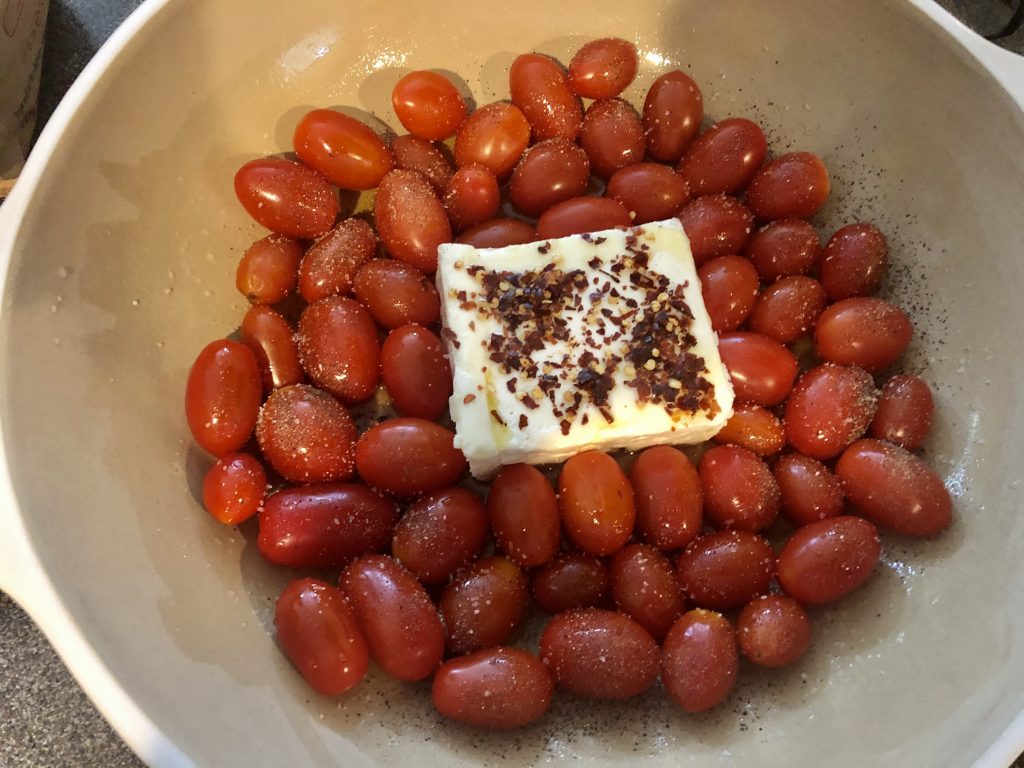
8 ounce block of feta cheese. Buy the block and not the crumbled feta
1 1/2 pounds cherry or grape tomatoes
1/4 cup olive oil
1/4 cup white wine. It is optional but I used it.
1/2 teaspoon crushed red pepper flakes. That gives it a little bit of heat so you may use 1/4 tsp if that is a concern.
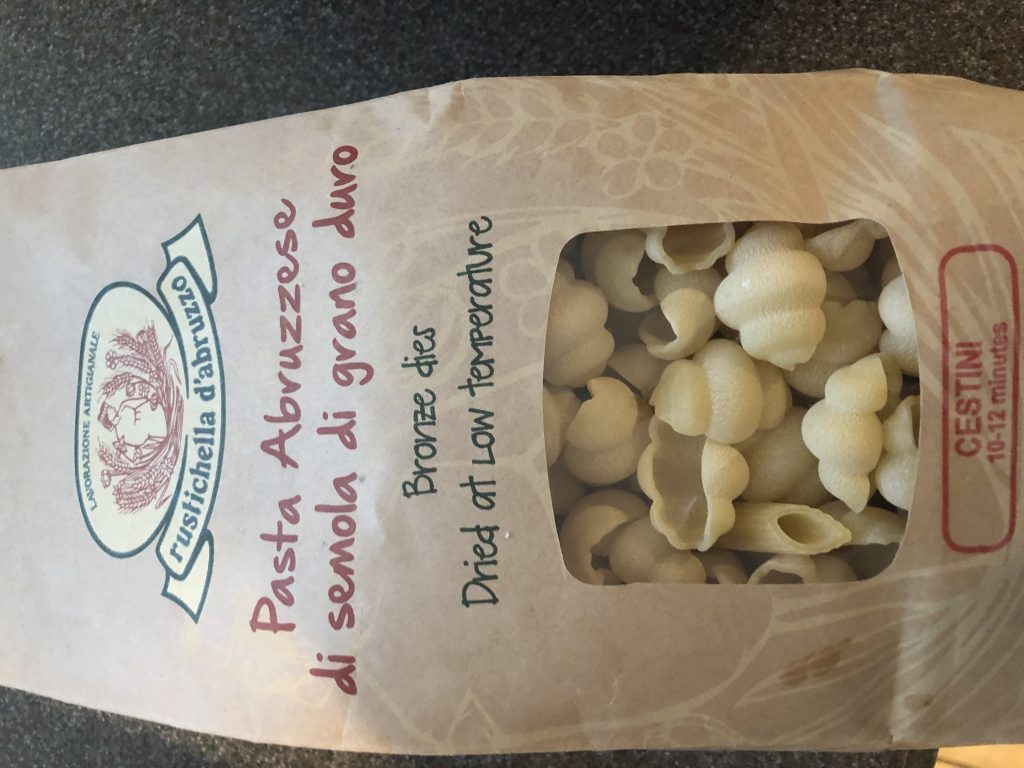
8 ounces uncooked pasta of your choice. The recipe showed a short pasta which I think will be better for this recipe. I bought a pasta from a company I had never used. It turned out great. Can’t turn the photo around so sorry for that but you can see it, right?
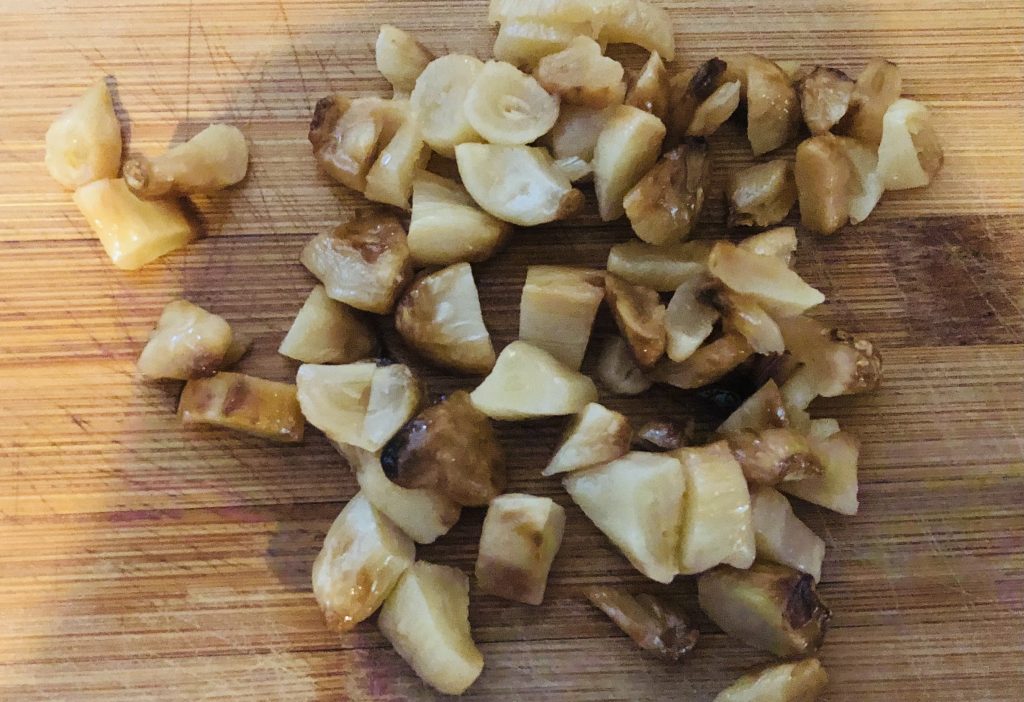
3 large cloves of garlic, pressed or minced. I was at Fresh Market in Rehoboth Beach and got already roasted garlic which I proceeded to chop.
1 large handful fresh baby spinach. Take stems out.
1 cup loosely-packed chopped fresh basil
shaved or grated Parmesan cheese, for garnish
Pre-heat oven to 400 degrees
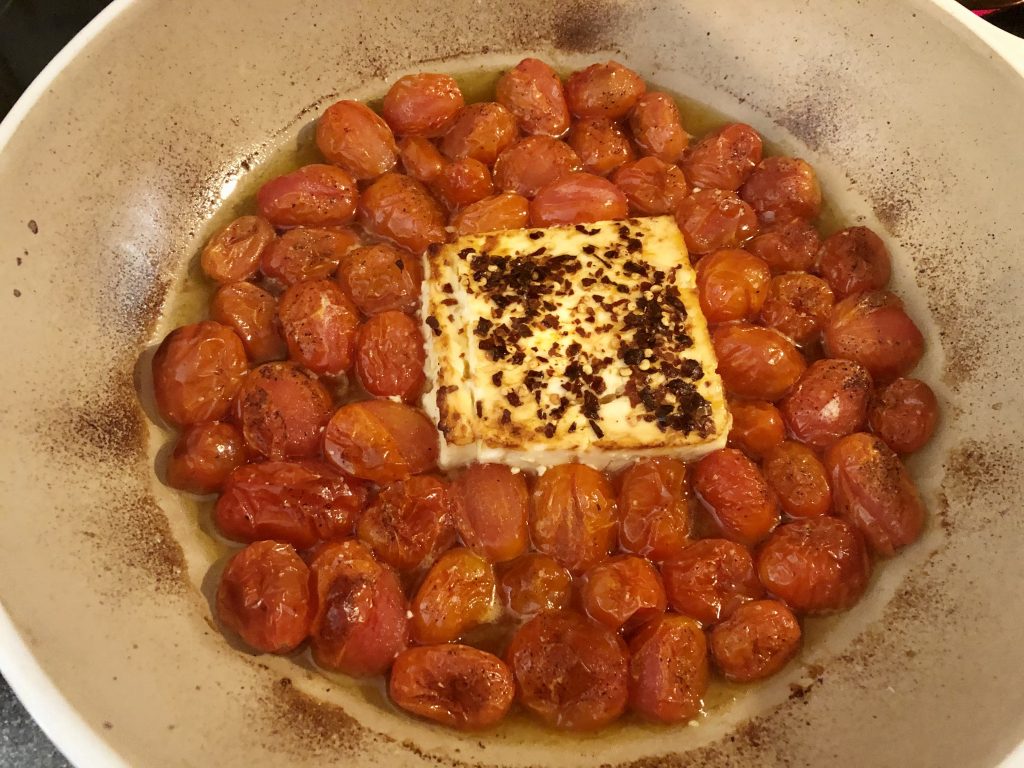
Make the Feta sauce by placing the block of feta in the center of a 9 x 13 inch baking pan or other baking pan. I had a round baking pan. Arrange the tomatoes around the feta, then drizzle everything evenly with the olive oil and white wine. Give the ingredients a brief toss so that they are evenly coated in oil. Sprinkle the crushed red pepper flakes evenly over the feta, and season just the tomatoes with a pinch of salt and black pepper.
Bake in the oven for 30 to 35 minutes. You want to see the tomatoes burst and are nice and juicy.
Cook the pasta about 10 minutes before the Feta and tomatoes are done. Use a nice large stockpot and salt the water generously. You want the pasta to be shy of al dente. Reserve 1 cup of the starchy pasta water and set it aside for later, then drain the pasta.
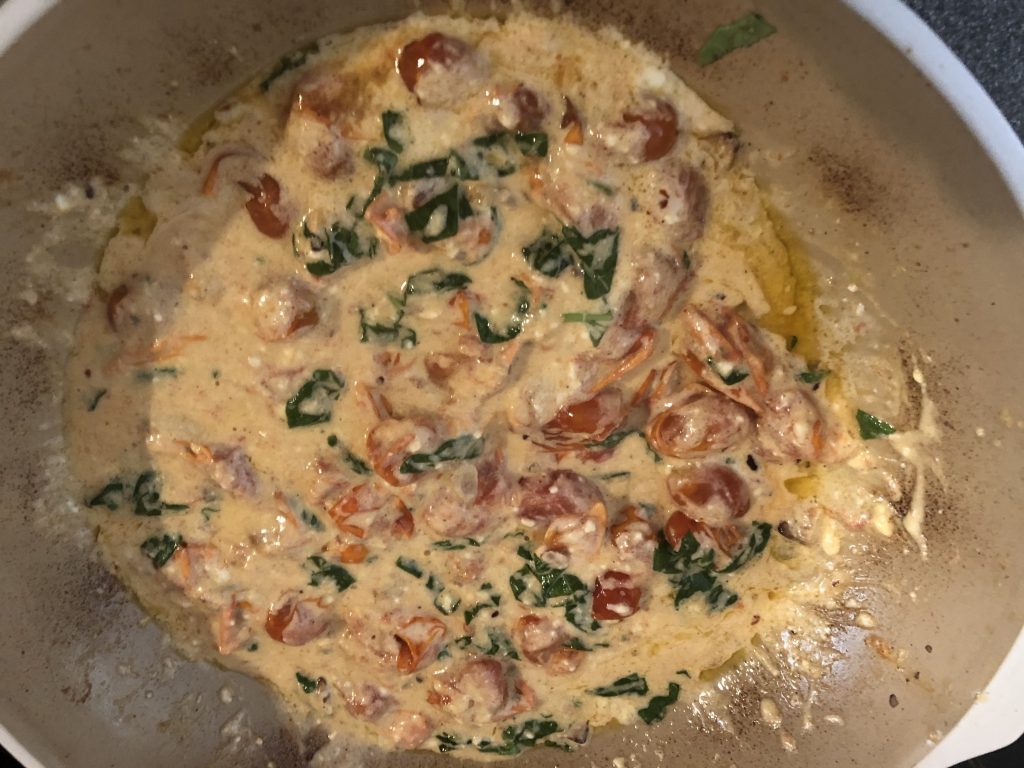
Remove the baking dish from the oven and immediately add the garlic and basil and stir the mixture together until the feta has melted into a creamy sauce. And, it will.
Add in the cooked pasta and spinach and gently toss until the pasta is evenly coated and the spinach has begun to wilt. If by any chance the sauce seems too dry, add in some of the reserved starchy water. Not much until it reaches the desired consistency. Mine was fine but I was ready to add the water and even some white wine if needed.
You can taste and season but I don’t think you need to add anything else.
Serve it warm and if you want you can garnish with the Parmesan cheese.
This recipe is a keeper. Enjoy it and make it your own.
Have a great week-end.
Comments Off on Baked Feta Pasta, Recipe, Easy, Recipes Begged, Borrowed or Stolen, What’s Cooking? Southern Delaware Cooks, Delaware Beaches
The easy entertaining time of the year is about to arrive. Barbecuing, outdoor dinners, backyard entertaining. Something easy is what calls for summer.
I love the name of this recipe. Peacock Vegetables. It is a recipe from 2002 and I have made it a lot. It is so simple. Vegetables and the rest you have in your pantry already.
Pre heat oven to 425 degrees
2 purple onions, cut into eighths
2 small yellow squash, cut in 1/2″ strips
2 small zucchini, cut in 1/2″ strips
1 each red, yellow and green bell pepper, cut in 1/2″ strips
4 cloves of garlic, sliced thin
2 tbsp. minced fresh parsley ( I like Italian)
1 tbsp. balsamic vinegar
1 tbsp. olive oil
1/2 tsp dried oregano or 3 tbsp. fresh oregano
1/4 tsp. salt
1/4 tsp. pepper
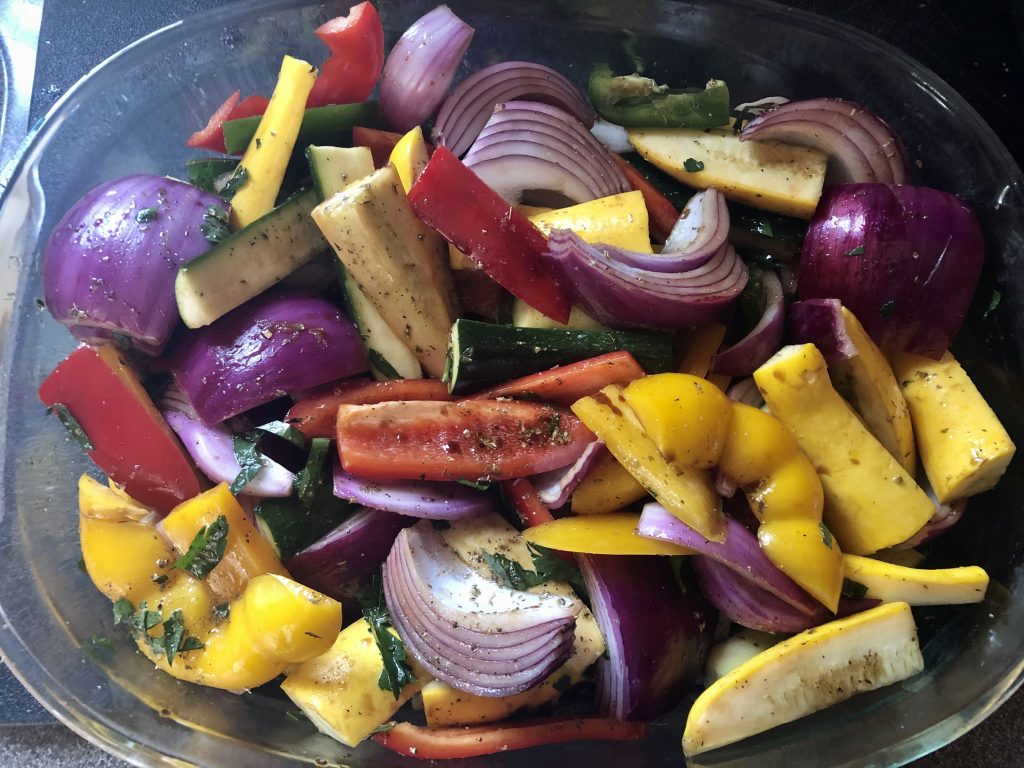
Place onion, squash, bell peppers and garlic in a bowl and toss well.
Combine remaining ingredients in a lidded jar and shake well. Pour dressing over vegetables and toss.
Spoon into a greased 9 x 13 inch baking pan.
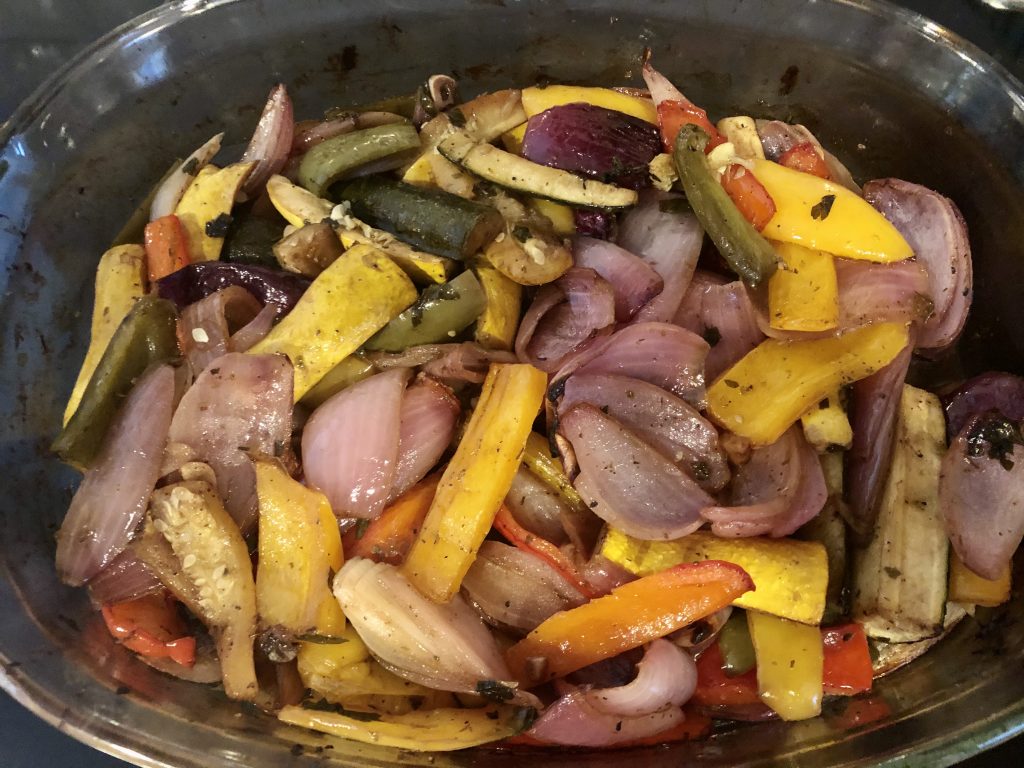
The photo above is before going into the oven.
Bake at 425 degrees for 20 minutes, stirring every 5 minutes.
Serve warm or at room temperature.
I served these veggies with my Cornish Game Hens, whose post was right here on March 28th.
Goes well with everything. Great tasting too.
Have a great day. AboutMyBeaches is on Facebook. Leave a comment there.
Comments Off on Peacock Vegetables, Recipe, Easy, Light Eating, Recipes Begged, Borrowed, or Stolen, Southern Delaware Cooks, Delaware Beaches
It may be the time of the day or the day of the week. Today, Monday, it is Meatless Monday. One day per week to get away from red meat and give our bodies a rest for healthier benefits.
The recipes may be Begged, Borrowed, or Stolen. You find recipes in books and you make them your own. I always add a little bit of this and a little bit of that.
This recipe caught my attention because I love scallops any which way. I thought the Tangerine Gastrique was interesting. A Gastrique is a reduction of sugar and vinegar infused with any flavor. In this case, tangerine juice.
The recipe was posted by Emeril Lagasse but to tell you the truth it needed more additions to a plain salad. Color like roasted peppers and roasted artichokes for once.
Ingredients
1 cup sugar (you certainly can reduce this amount)
1/2 cup rice wine vinegar
1/2 cup fresh tangerine juice (could not find any so a orange/ mango juice was used)
A pound of scallops
1 tablespoon olive oil (a little more if needed)
salt and pepper
1 cup of arugula (I used a bit more)
1 tablespoon of extra virgin olive oil
salt and black pepper
2 tangerines, peeled and separated
roasted pepper cut in strips
roasted artichokes or canned ones will do
2 or 3 ounces shaved Parmigiano-Reggiano cheese
Let’s make the gastrique. In a medium sauce pan, combine, sugar, rice wine vinegar, and the juice. Bring up to a boil, then reduce to a simmer. Reduce until the liquid gets syrup like, about 10 to 15 minutes.
For the scallops, please dry them on paper towels. You always should do that before cooking scallops.
In a saute pan, heat the olive oil. Season each scallop front and back with salt and pepper. When the pan is very hot, add the scallops. Sear them on one side until golden brown, a couple of minutes it is only what it will take.
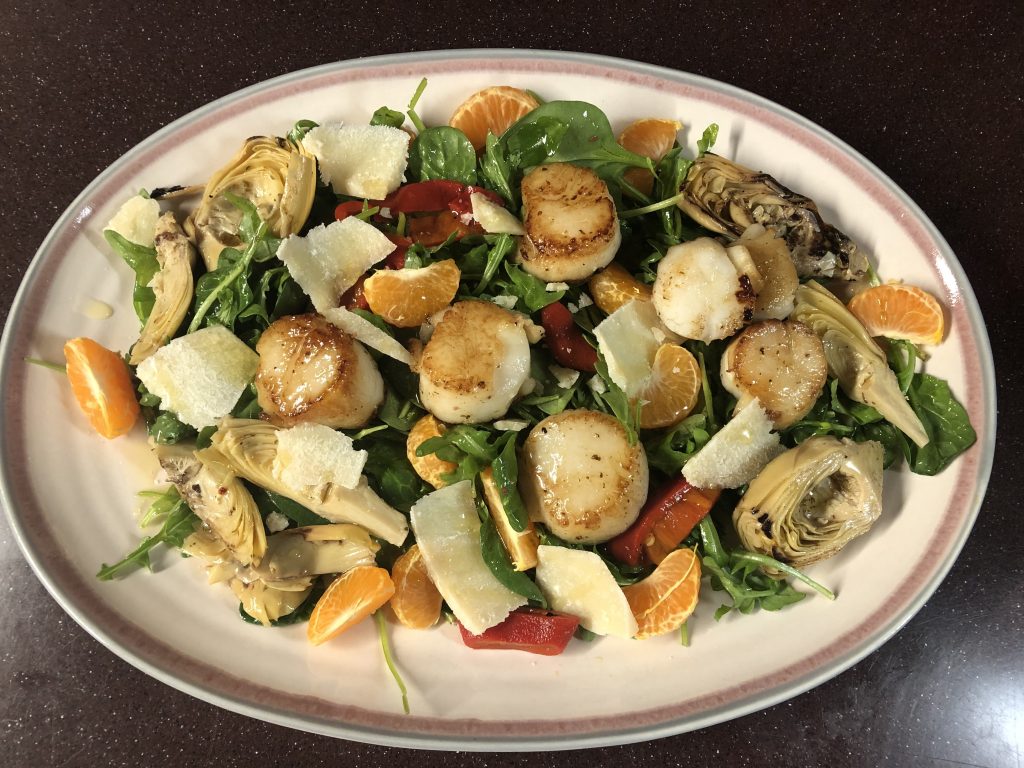
Toss the arugula in a salad bowl with extra virgin olive oil, along with the roasted pepper strips and the artichokes.
You can put the salad mixture in a large platter, add the tangerines to make a pretty presentation. Add the cooked scallops and drip the Gastrique all over. Sprinkle the shaved cheese.
A little bit of sweetness combined with scallops turns out to be a very nice salad.
Enjoy!!
Comments Off on Salad, Seared Scallops, Arugula, Tangerine Gastrique, Recipe, Easy, Recipes Begged, Borrowed, or Stolen, Meatless Monday, Southern Delaware Eats
I remember when I was young Sunday was a day to gather at my grandmother’s house. After church it was the satisfaction of gathering with cousins and with good comfort food. My grandmother was a very good cook; always cooking with the best ingredients she could fine.
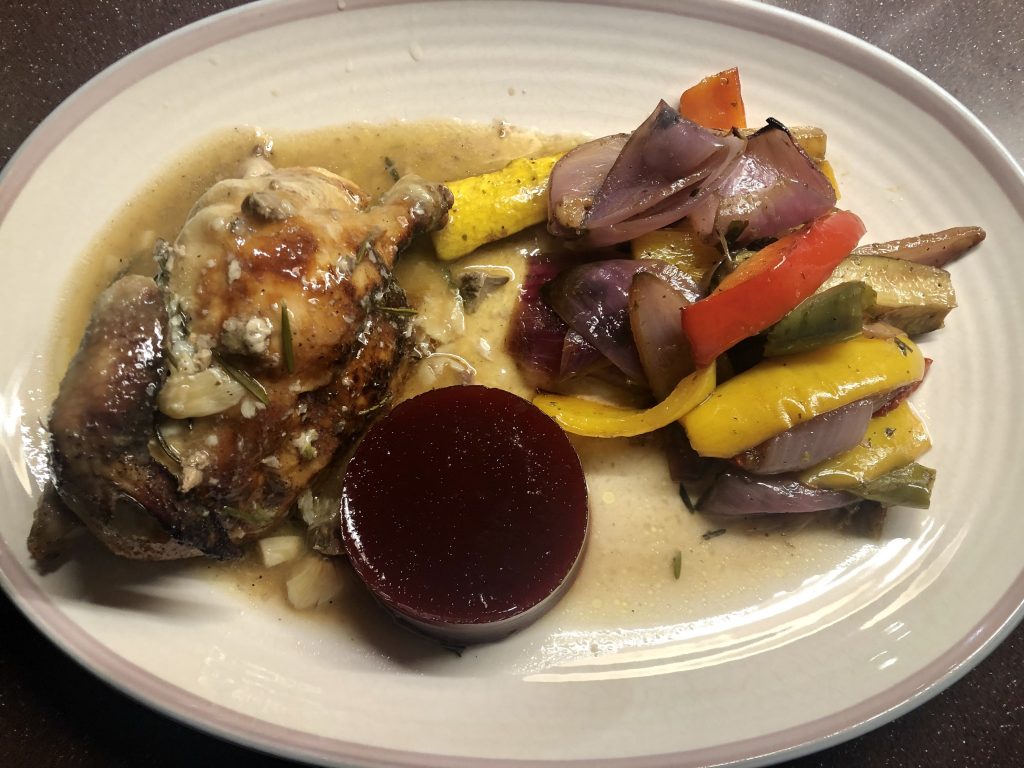
Not sure why I think of Cornish Game Hens as a Sunday Supper dish. I have stuffed them, cooked them with prosciutto and figs as well. They have great flavor. And what are they, really? I found out that they are the product from a cross between the Cornish and White Plymouth Rock chicken breeds, that it is served young and immature, weighing no more than two pounds ready to cook.
We have a good butcher here in Rehoboth Beach. Hickmans!! I picked these Cornish Game Hens around the holidays. They were pretty big. Last week I made this recipe. By no means the recipe is my own, but I did give it my own spin.
They are easy to prepare. I usually do not serve a guest a whole hen even though you could depending on the size.
2 Cornish Game Hens
salt and pepper to taste
1 lemon, cut in half
rosemary sprigs (2 per hen)
olive oil
15 cloves of garlic and more if you do like garlic like I do
2/3 cup of white wine (it is a great additions to the sauce)
2/3 cup of chicken broth (I used chicken stock)
More fresh rosemary sprigs for garnish
honey
The first thing to do is to preheat the oven to 450 degrees.
Then take gizzards and neck from the hens and put them aside. You will use them in the broth.
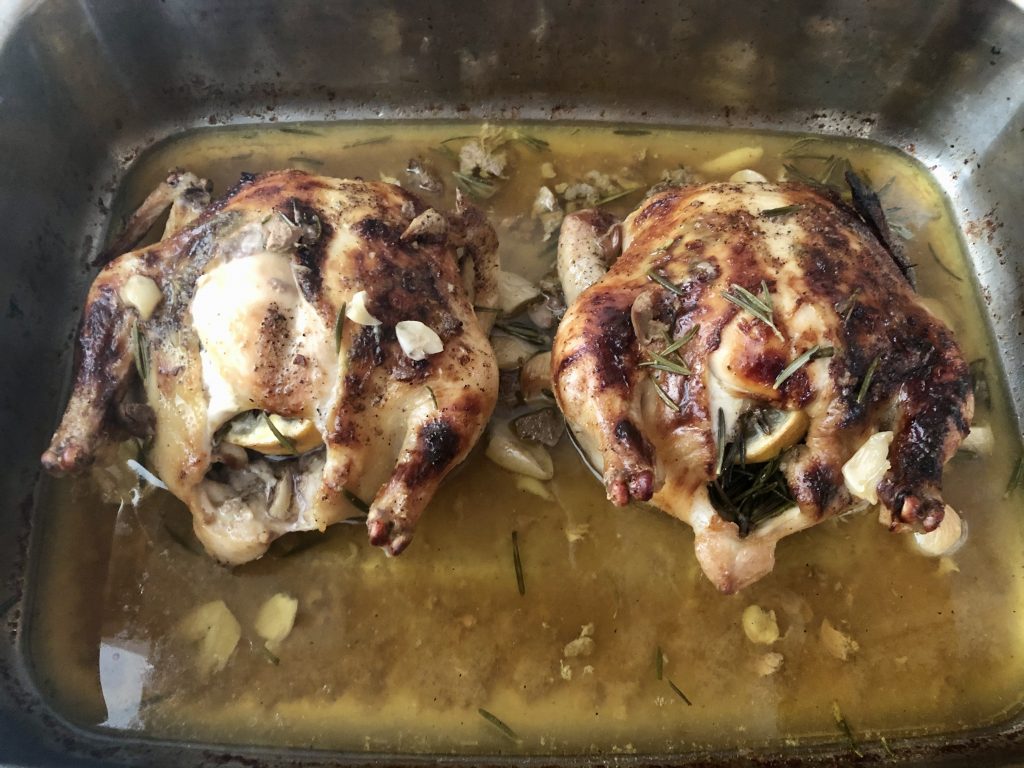
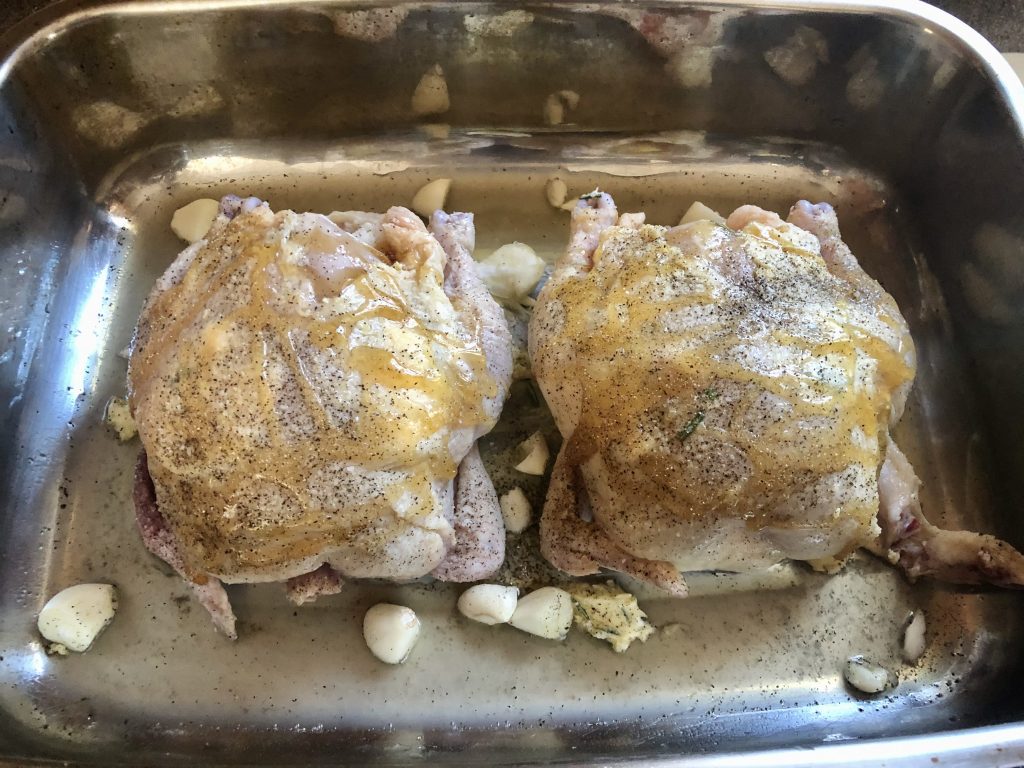
Rub the hens with salt and pepper. Place one of the lemon wedges in the cavity along with a sprig of rosemary. Also put one garlic clove in each of them. If you look closely you can see that I drizzled honey over the top. Very yummy!!
Arrange them in a heavy roasting pan. Take some of the rosemary leaves and spread them around the pan. Put the whole garlic cloves around the hens in the pan. In order to avoid the garlic to burn since you at first will be cooking on a high temperature, take some extra chicken stock and pour into the pan in order to cover the cloves a bit.
This is how they will look before going into the oven.
You are going to roast them in that temperature for 25 minutes.
The gizzards and neck that you took from the oven place in a pot and cook for 10 or 15 minutes. Once that is done, cut the gizzards, heart and set aside. This is totally optional. I just think it adds to the broth.
In a mixing bowl, whisk together wine, chicken broth, 2 tablespoons of olive oil and the cut gizzards, etc.
Reduce the oven temperature to 350 degrees. Pour the broth above the hens and continue roasting about 25 minutes longer or until hens are golden brown. Baste with the pan juices every 10 minutes.
Transfer the hens to a platter, pouring any cavity juices into the roasting pan. You can put the pan on top of your burners and heat up the juices, smashing those garlic cloves which will be amazing combining them in the broth. I used a little bit of corn starch because I wanted the broth to be a tad thicker.
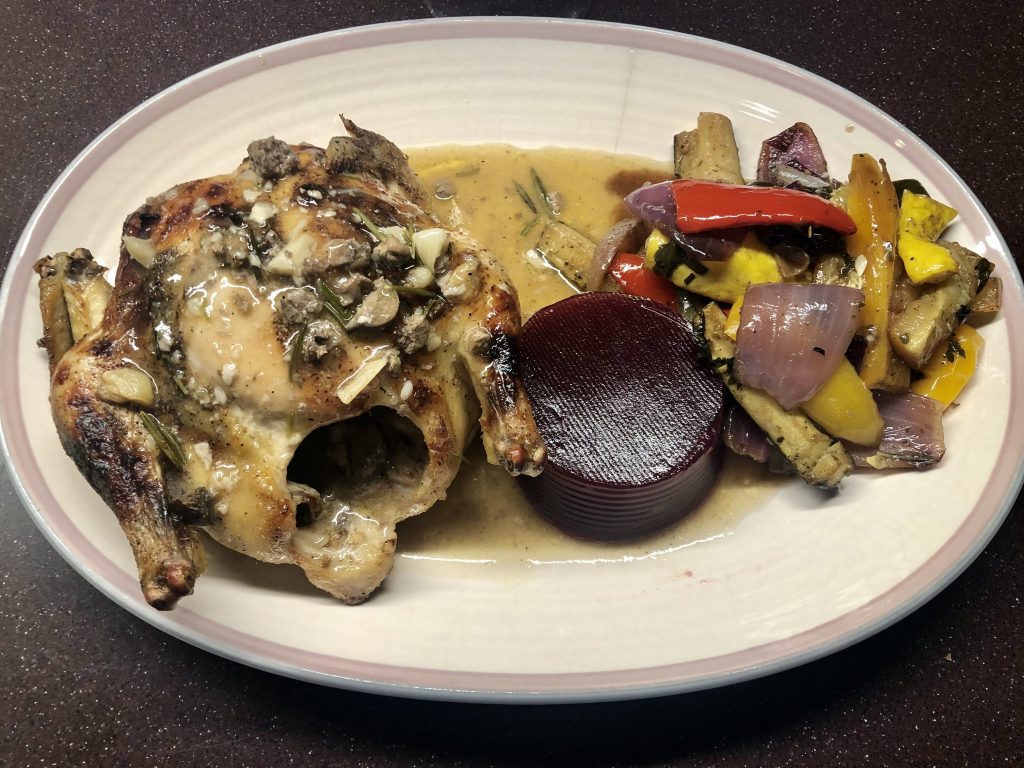
You can cut them in half or serve them whole. Cranberry looked pretty and appropriate with them. And, those veggies? I will give you the recipe because they went perfectly with the hens. Easy too. Next post.
Here is a photo of the hen in half. It depends how hungry your guests are. And please make sure to put a lot of broth in the plate.
Enjoy!! Talk to you later.
Comments Off on Cornish Game Hens, Recipe, Easy, Delicious, Recipes Begged, Borrowed, or Stolen, The Art of Wining and Dining, Coastal Delaware Eats
“We must have a pie. Stress cannot exist in the presence of a pie.” david mamet
When I am out and about trying restaurants or frequenting my usual haunts I usually do not order dessert unless someone at the table does and then share a bite here or there.
I appreciate them from afar, looking at them longingly. But, you know that desserts are loaded with calories and sugar so I abstain.
When guests sit at my dining room table they will be served from soup to nuts. Dessert will be a must and at time more than one offering.
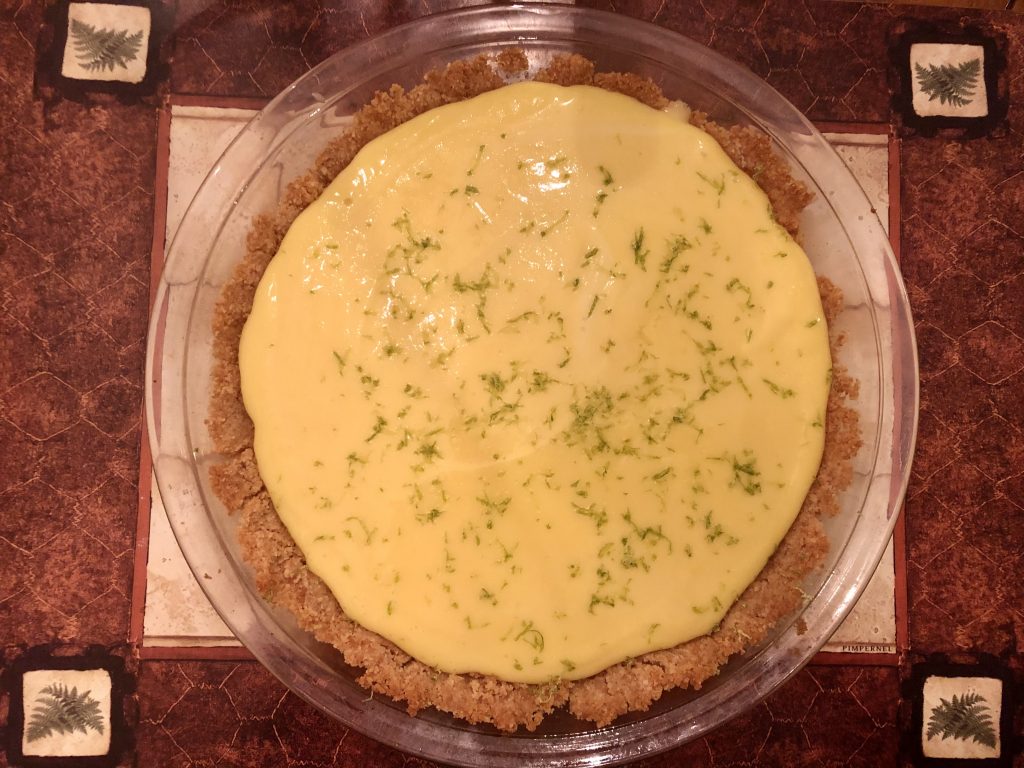
I love the Key Lime Pie. I like it tart. I find it refreshing and the perfect way to end a meal year-round.
This Key Lime Pie recipe is so easy. Pretty much I think people enjoy it. I use bottled Key Lime juice. Those little key limes take forever to squeeze.
The recipe appeared in the school cookbook called A Collection of Recipes II that we all worked on when our kids went to Worcester Country School in Berlin, Maryland. It is now called Worcester Preparatory School.
Parents, grandparents, friends, restauranteurs, they were all so generous with their recipes. This particular one was given by Mrs. Anne Braniff. Not only is she an amazing baker but she is also a good cook.
Crust:
1/2 box Keebler Vanilla Wafers
2 ounces Macadamia nuts
1/2 stick butter or margarine
Filling:
1 (14-ounce) can sweetened condensed milk
4 egg yolks
3-4 ounces Key Lime juice (I put 4 ounces)
In a food processor (or blender) mix wafers and nuts until fine crumbs result. Melt butter; add to crumbs and process until moist.
Press crumbs into a 9″ pie pan. Bake at 375 degrees for 5-7 minutes. Take it out of the oven.
To prepare filling, combine milk and egg yolks at low speed. Slowly add juice, mixing until well blended. Pour into pie shell and refrigerate for at least 4 hours. You may also bake the pie at 350 degrees for 8 minutes. I did not.
Garnish with whipped cream or meringue is optional.
I grated some lime to add a little green color on the top.
You may also substitute low-fat wafers and low fat or no fat condensed milk. I kept it traditional and full of calories.
Enjoy!! It is delicious.
Comments Off on Key Lime Pie, Recipe, Easy, Recipes Begged, Borrowed or Stolen
Back in 1997 I was the Chairperson for a cookbook called A Collection of Recipes II. It was a project of the Worcester Country School Parent’s Association. The school is now called Worcester Preparatory School and it is located in Berlin, Maryland.
We asked parents, grandparents, and local restaurants to give us their best recipes. And they did!! It took us many months to get everything compiled and many of us worked hours to bring this book to the community.
I love neighborhood cookbooks. To me these recipes are the center of someone’s kitchen. Recipes used over and over again for holidays, and family gatherings.
At Worcester a lot of the recipes showed up at the Teacher Appreciation Lunches. They are all good and I used this book frequently.
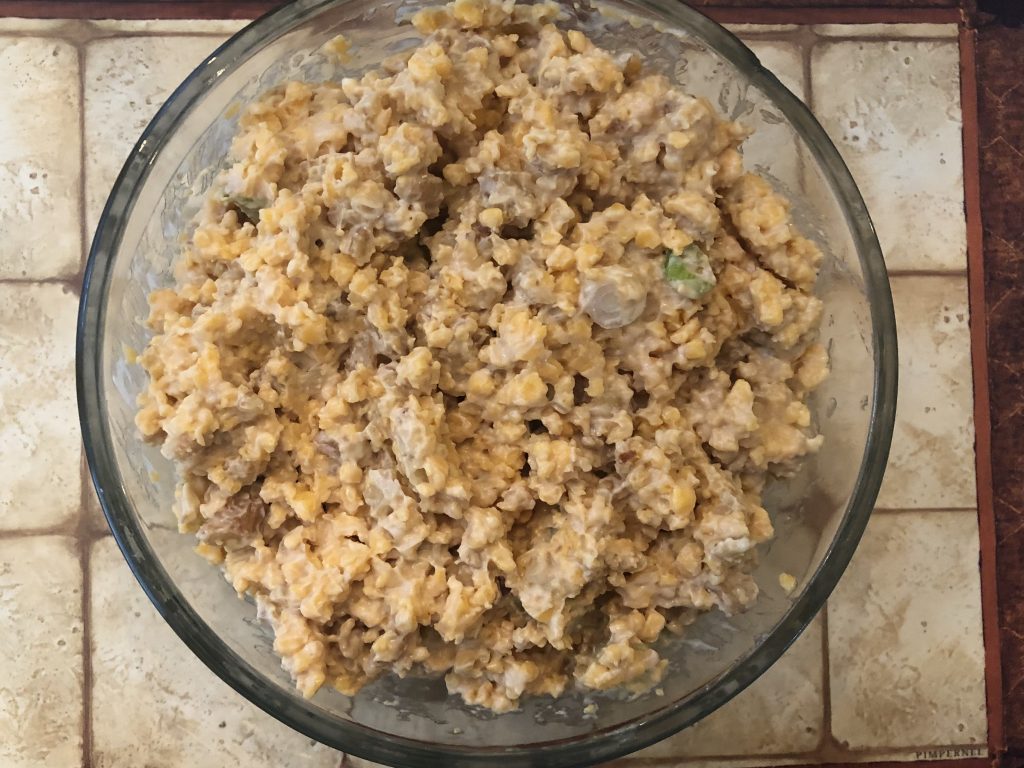
Better Cheddar is a recipe given by one of our grandparents. Mrs. Carol Cairo knew that this recipe, as simple as it was, would be a hit. It had a secret ingredient…..Liquid Smoke.
Serve the Better Cheddar with crackers or dipping pretzels.
Ingredients:
1 pound New York Extra Sharp cheese, crumbled
1 cup walnuts, chopped
6 scallions, chopped
1 cup of mayonnaise (I like Dukes)
1 teaspoon Liquid Smoke (you can put a bit more after tasting)
1 teaspoon Worcestershire Sauce
To crumble the cheese, first cut it in chunks and then put in a food processor until it crumbles. I have a very small food processor and I made it in a couple of batches. Easy.
The walnuts, you can also put in the food processor of a few seconds or pulse it so they are chopped.
I have yet to have a guest say they don’t like it. You really get hooked.
Hope you love it as much as I do. Great for appetizers!!
AboutMyBeaches is on Facebook. This blog was started in 2009. Come back often to find out about events, restaurants, reviews, where to shop and what to cook for dinner.
Have a great week.
Comments Off on Better Cheddar, Cheese Dip, Recipe, Easy, Tried and True Recipe, Recipes Begged, Borrowed or Stolen

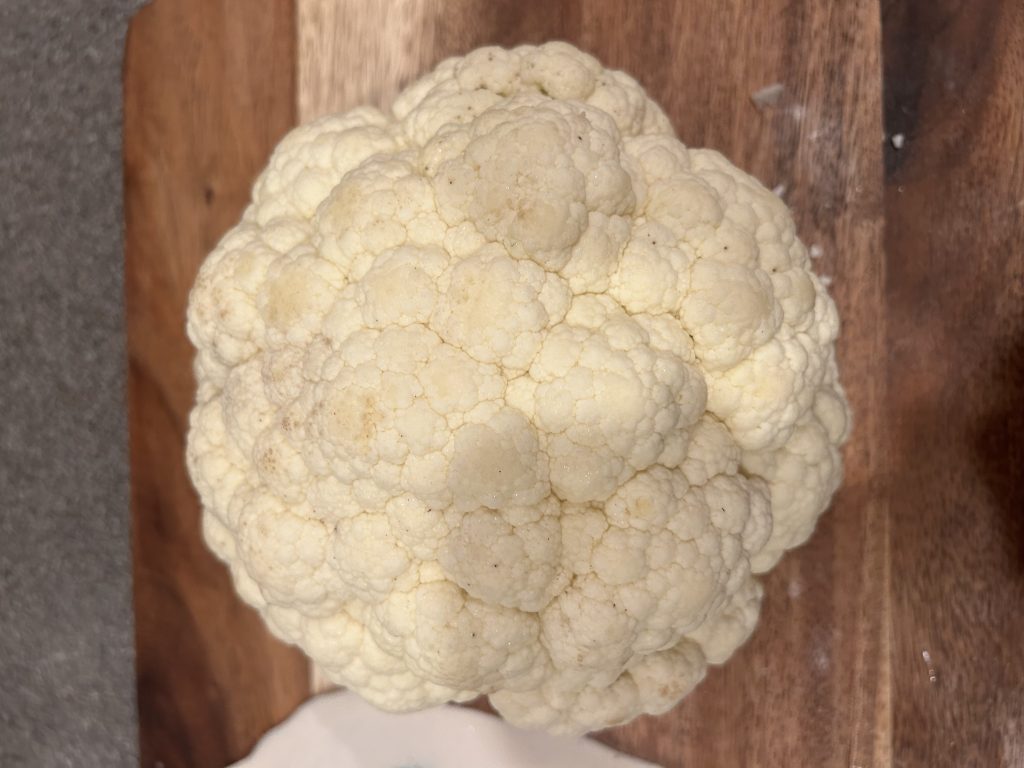
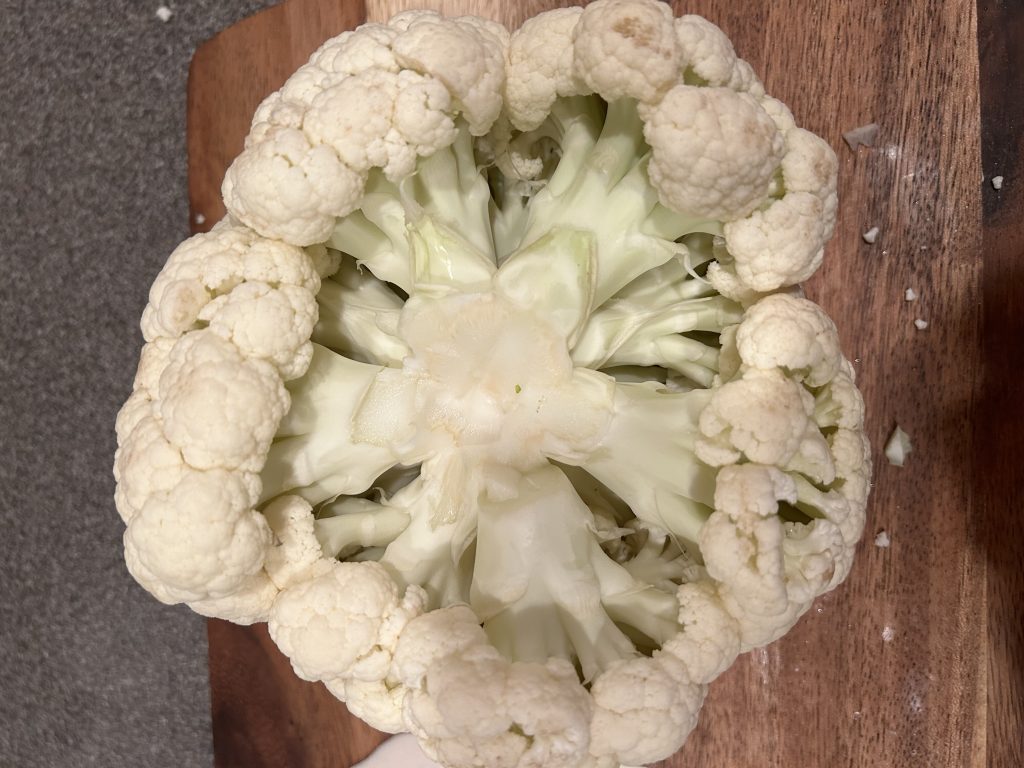

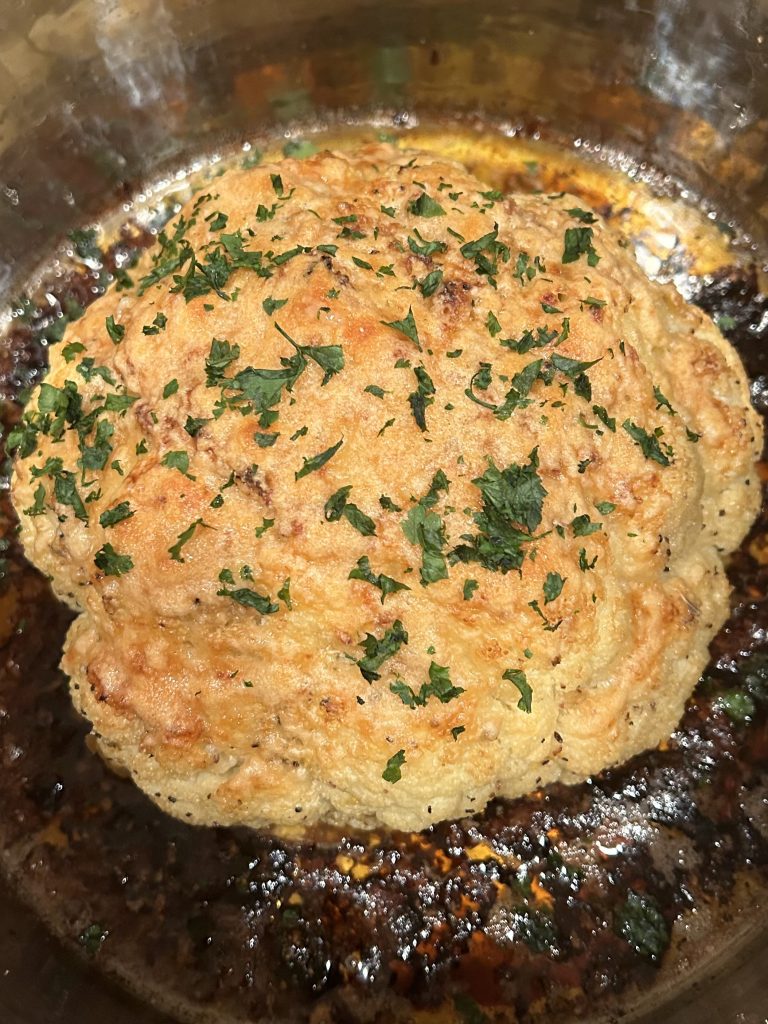

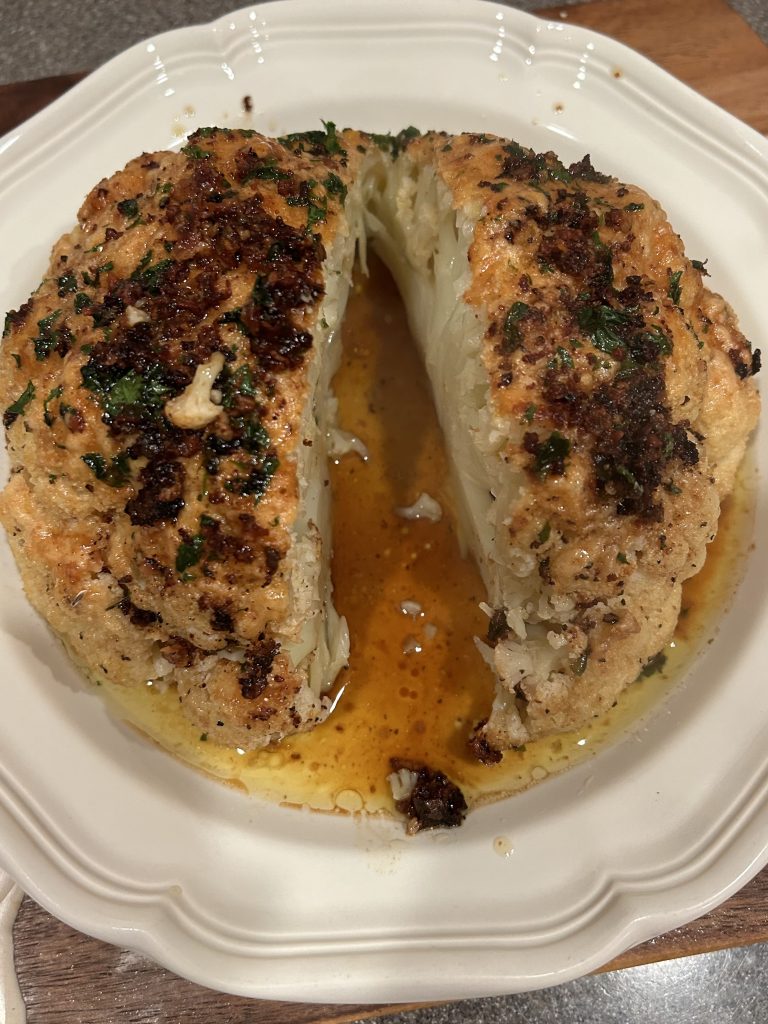


Comments Off on Whole Roasted Cauliflower, Recipe, Meatless Monday, Delaware Beaches