Don’t you love those recipes that you keep making them year after year. At times they are only made at certain times. Could be holidays, birthdays, or just because.
I call these recipes Keepers. We keep them close and even though they may not be an original recipe, then you make it your own by adding a little bit of this or a little bit of that.
In 2007 Rachel Ray shared one of her mother’s recipes. It is called Elsa’s Cider Beef With Smashed Cheddar Potatoes. Over the years I have made it and truly love it.
Following is the recipe for this comfort food, more so on a chilly winter night like tonight.
2 tablespoons of extra-virgin olive oil
3 tablespoons of butter
2 lbs. top sirloin, trimmed and cut into 1 1/2 inch cubes
salt and black pepper
1 large onion, chopped
3 medium carrots, peeled and chopped (I added an extra carrot)
1 lb turnips, peeled and chopped
4 tablespoons of all purpose flour (If you make this recipe gluten free you need another type of flour. It will work.)
2 cups good quality apple cider (dark and cloudy) 100% cider, not juice
1 15 ounce can of beef stock
3 lbs of Idaho potatoes. I did half and half adding sweet potatoes, peeled and chopped.
1/2 cup milk (I used fat free half and half)
1/2 cup sour cream (I used light sour cream)
2 cups shredded sharp white cheese (I used extra sharp)
3 tablespoons chopped or snipped fresh chives.
Pre heat oven to 425 degrees.
Place a large stew pot or Dutch oven with a lid over medium-high heat. Add the olive oil and butter. When the butter melts, season the beef with salt and pepper. I used rock salt. Add to the pot. Brown on all sides about 7 to 8 minutes.
Add the onions, carrots, and turnips and cook for about 5 minutes.
Sprinkle the veggies and meat with the flour and stir to combine for about 1 minute.
Stir in the apple cider and the beef stock, bring to a boil, cover the pan and transfer to the oven. Braise it for 45 minutes.
In 15 minutes boil the potatoes in salted water. Make sure the water covers the potatoes. Bring to a boil over high heat, then reduce the heat a bit. Cook about 15 minutes until tender.
Drain the potatoes, return to the pot and add the milk, sour cream, and cheese. To mash the potatoes I used a hand blender, then added a bit of salt and pepper (optional) and the chives. Cover and keep warm. If they cool off then place in microwave and reheat.
To serve, ladle the stew into bowls. Make a well in the center and fill with the potatoes. I put the potatoes first and made the well and then fill with the stew. Your choice.
It is delicious. The combination of beef, turnips and apple cider gives a distinct flavor.
Hope you like it.
Comments Off on Comfort Food, Cider Beef, Smashed Cheddar Potatoes, Recipe, Rehoboth Beach, Delaware, Delaware Beaches, Soups and Stews, It’s Chilly Out There!!
I don’t know about you but I think we are becoming better cooks nowadays. I wish I could say the same about baking. It is not my forte but I can make a few things too.
I always say that Thanksgiving is a time for an overabundance of food, but, Christmas I like a more simple meal. If you saw my last post a prime rib roast is nothing simple. It makes an amazing presentation, more so if cooked right.
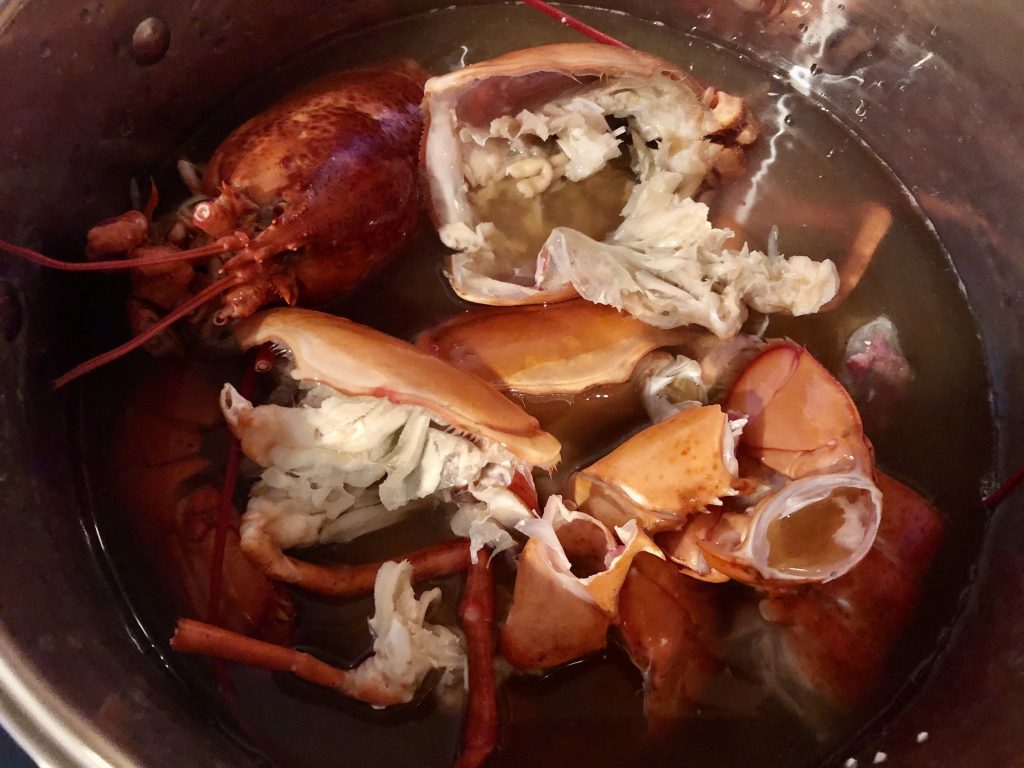
As New Year approached I think I had my fill of beef. Time for some lobster. It looks so pretty at a table and it is delicious. I decided to make a Lobster Newburg. I usually make recipes my own because I add a little bit of this and a little bit of that. At times a secret ingredient of saffron can make it taste out of this world. A few sweet peas….not sure if that’s even on a Lobster Newburg. Some make toast points…..Oh no, we had it over pasta. Pair it with a French 75 cocktail using Courvoisier instead of gin, believe me it is to die for.
The broth had so much taste because using the shells it is the way to go when making a seafood broth.
Save the rest of the broth. You can freeze it for another time.
New Year’s Day is a new beginning. Starting up with a decadent breakfast is always a must. Eggs Benedict, my own style too. Did not want any bread so on top of the grilled asparagus and Surry ham from Surry, Virginia, poached eggs and homemade Hollandaise Sauce.
And then came the Apple Toddy. This recipe has winesap apples which are hard to get around here, nutmeg, allspice, cloves, sugar, grated orange rind, rum, peach brandy, apple brandy, bourbon and lemon juice. You need to start this by cooking the apples then everything goes in a crok in a stoneware crock for 16 weeks. So start way before the holidays and place it in your garage in a cool place.
To drink it pour in your desired glasses and you can cut the apples up in bite size pieces. I never used to enjoy it years ago but I have acquired a liking for this old family recipe.
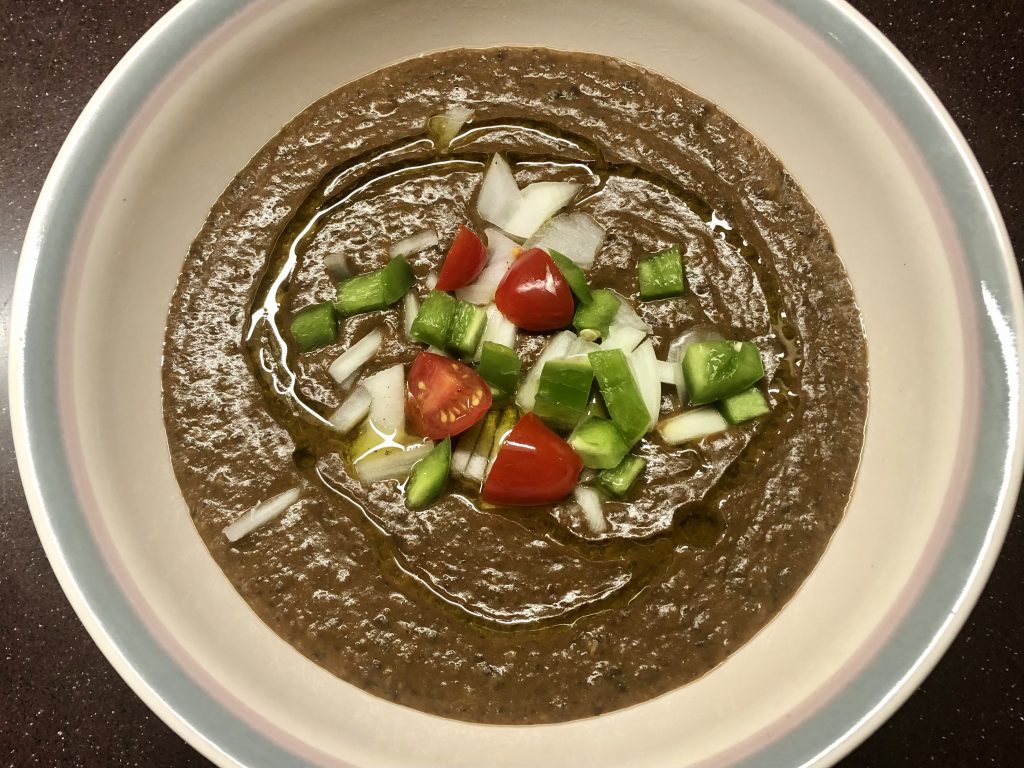
So in order to finish the day I wanted to get some black eyed peas. Nowhere to be found. Yeap, I went a little too late to some of the stores. I wanted that good luck everyone says they bring you. Black beans will have to do. I decided to make a black bean soup which if I say so myself was pretty good for not planning anything in advance. A little garnish here or there and it turn out as good as the photo shows.
And so another year begins. I did not make any resolutions. I will take one step at a time, enjoying every moment, every day.
Wishing you the best for 2021.
Comments Off on New Year’s Eve, New Year’s Day, Southern Delaware Eats, Delaware Beaches, 2021, Rehoboth Beach, Lewes, Wining and Dining at the Delaware Beaches
A simple mantle, a hot fire, Christmas is just a few days ahead. Growing up in Puerto Rico the weather is constantly warm. It does have a cooler season from January until the beginning of March. Best time to visit.
Holidays in Puerto Rico are very long. They last until mid January, when other festivals will also take place. It is like anything, it is not the same way now. In my youth there were great family parties during Christmas and then during Three Kings Day or El Dia de Los Reyes there were roasted pigs, blood sausage, which by the way are the best, tripe and all those things someone other than a foodie would think is so foreign. A Spanish island full of history and tradition. Three Kings Day is the Epiphany. Very Catholic too.
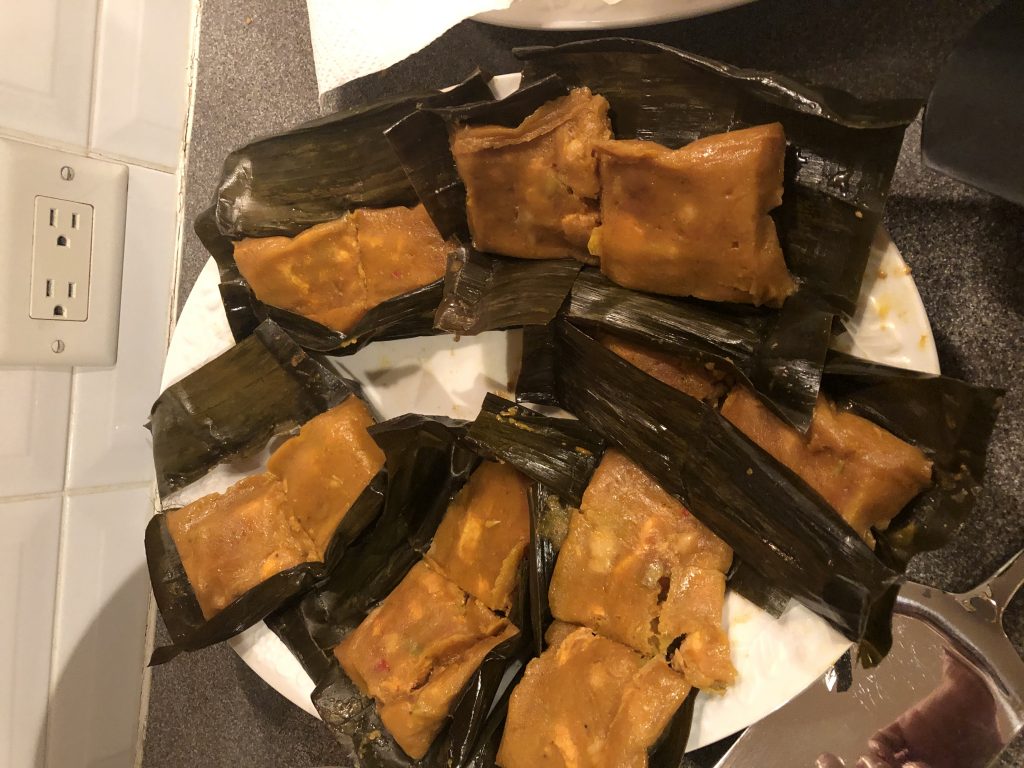
Pasteles are typically eaten during the Holiday Season. My grandmother Juanita made the best. Very labor intensive. They almost look like a tamal. Made out of plantains with and an adobo stuffing, olives, chickpeas, raisins, chicken, pork or beef, then wrapped in banana leaves. They are also made out of yuca, a root vegetable.
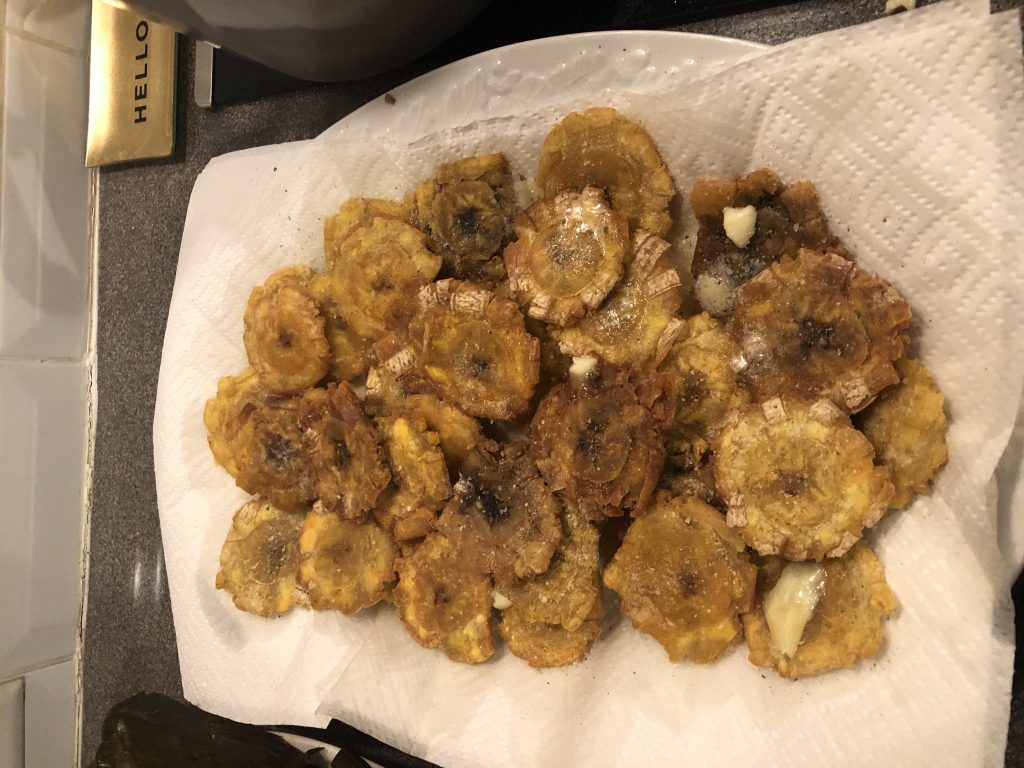
The photo above shows the ones I had flown from Orlando, Florida for my Three Kings Day dinner where my friends tasted them among other things like fried plantains called tostones.
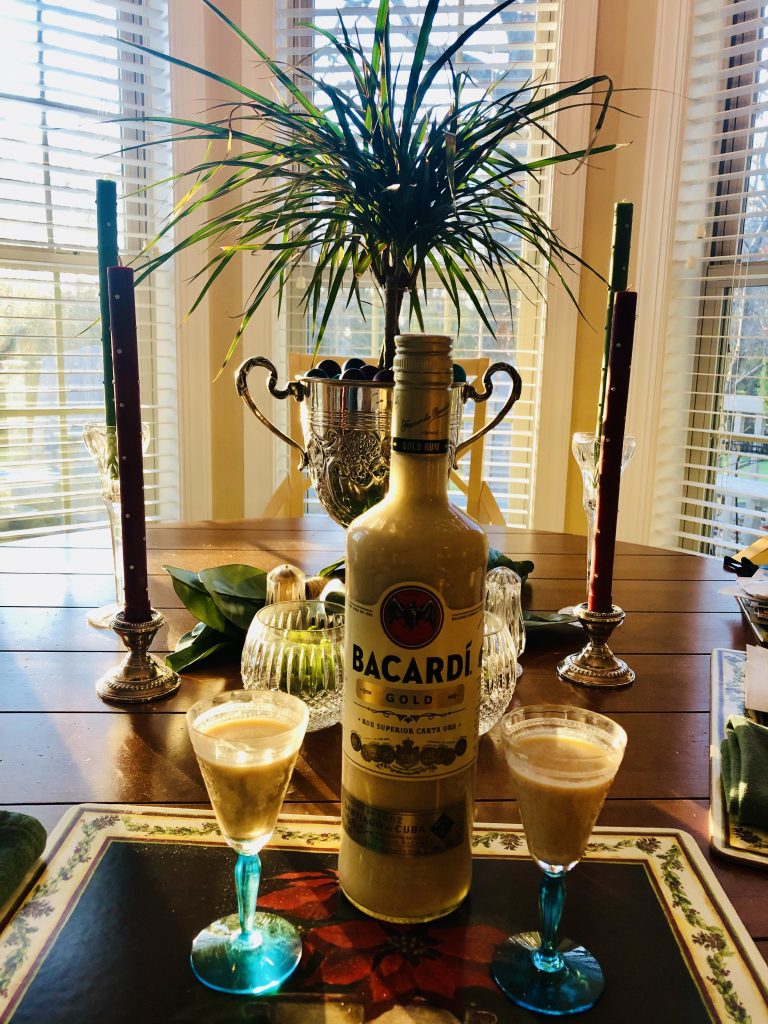
Getting to the purpose of my post is the Coquito or Puertorican Eggnog. They said the Spanish invented it. Who knows. It is indigenous to the island, though. Everyone has a recipe, adding a little bit of this or a little bit of that. Rum being a main ingredient for sure. I love drinking it in a small aperitif glass.
The glasses here were my grandmother’s Palmira Pereyo Lopez. I love them and they are perfect for my Coquito. I used the Barcardi Gold Rum. I almost forgot, but you fill the empty rum bottle and give it as presents.
This recipe I have comes out delicious. I even got glass bottles to give some away. So this is how it goes:
Mi Coquito Navideno
4 cans (12 ounces each) of evaporated milk
1 can of condensed milk
2 cans (15 ounces each) of coconut cream, not coconut water
2 teaspoons of Vanilla
2 teaspoons of Cinnamon
6 egg yolks
1 bottle of rum (750ml) I used Bacardi Gold
a cap of Brandy or more
Beat by hand the 6 egg yolks in a small container
Blend separately the following in a large container 1 can of the evaporated milk, vanilla, and cinnamon.
Add the beaten egg yolks, the rest of the evaporated milk, the condensed milk, the coconut cream and the Brandy.
Then the whole bottle of rum. Mix well.
NOTE: Some time the Coconut Cream has separated. Mix it well. If the Coquito is lumpy use a sieve and put through the whole mixture.
The Coquito is not thick. It does get a little thicker when refrigerated.
Drinking it cold is the way to enjoy it. It can last in the refrigerator for some time because all the rum it has. It won’t last long though.
Anyway, play with it and make it your own.
Merry Christmas and Happy New Year. Feliz Navidad.
Comments Off on El Coquito Navideno, Puertorican Eggnog, Christmas Traditions, Puerto Rico, The Caribbean, La Isla del Encanto, Feliz Navidad
Some of us that like to cook say that the best restaurant is usually your home. It is even better when you have friends over.
The idea of having a few over for Brunch and then off to check out Mill Pond Garden in Lewes, was a no brainer. Mimosas, Bloodys, what would be better? The weather? Of course, and it did hold off.
My previous post is about Mill Pond Garden. Check their website for upcoming events. They open to the public once a month and I cannot say enough about how beautiful this garden is. http://www.millpondgarden.com
The primary purpose for brunch was to shake off headaches and give a rest to gurgling stomachs. An Englishman by the name of Guy Beringer supposedly invented the brunch. It was really to pacify his own hangover. He wrote an essay; Brunch: A Plea, in 1895. This was written to help those who nursed hangovers every Sunday morning from the night before.
And, no, we were not nursing any hangovers last Sunday. We just wanted an excuse to get together with a few and for a couple of hours enjoy their company, chatter, and good food.
The ham cooking, the breakfast casserole almost ready and the aroma filling the house on Sunday was priceless.
The following 2 recipes are keepers. They are easy to assemble and cook and you still can enjoy your company.
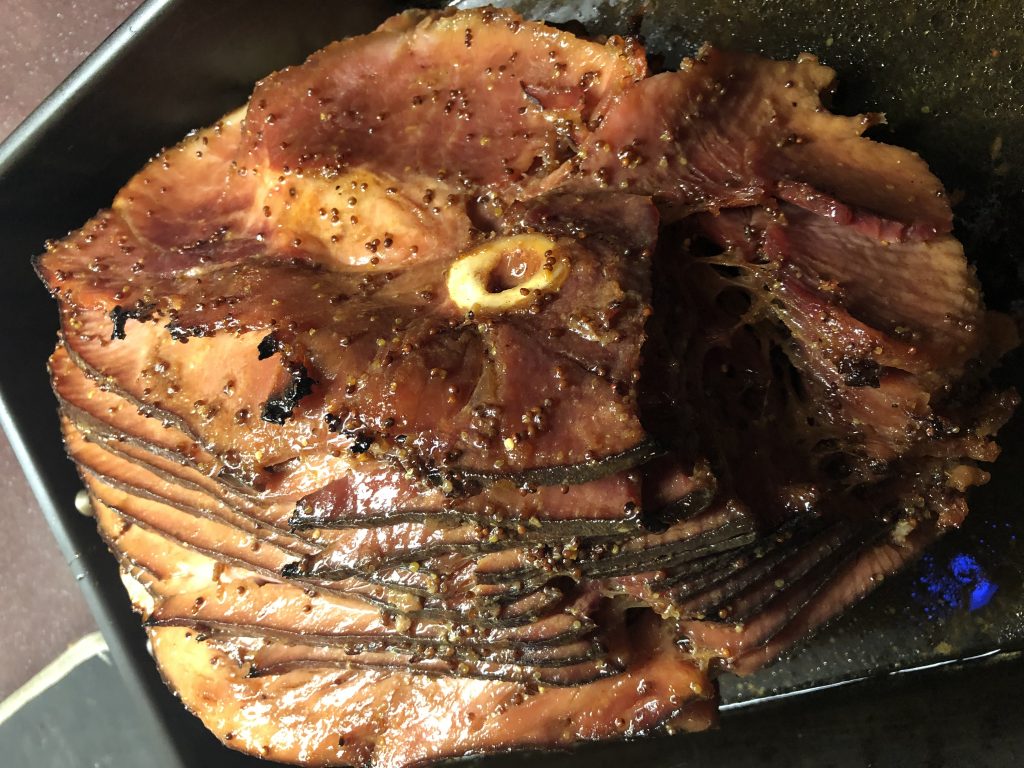
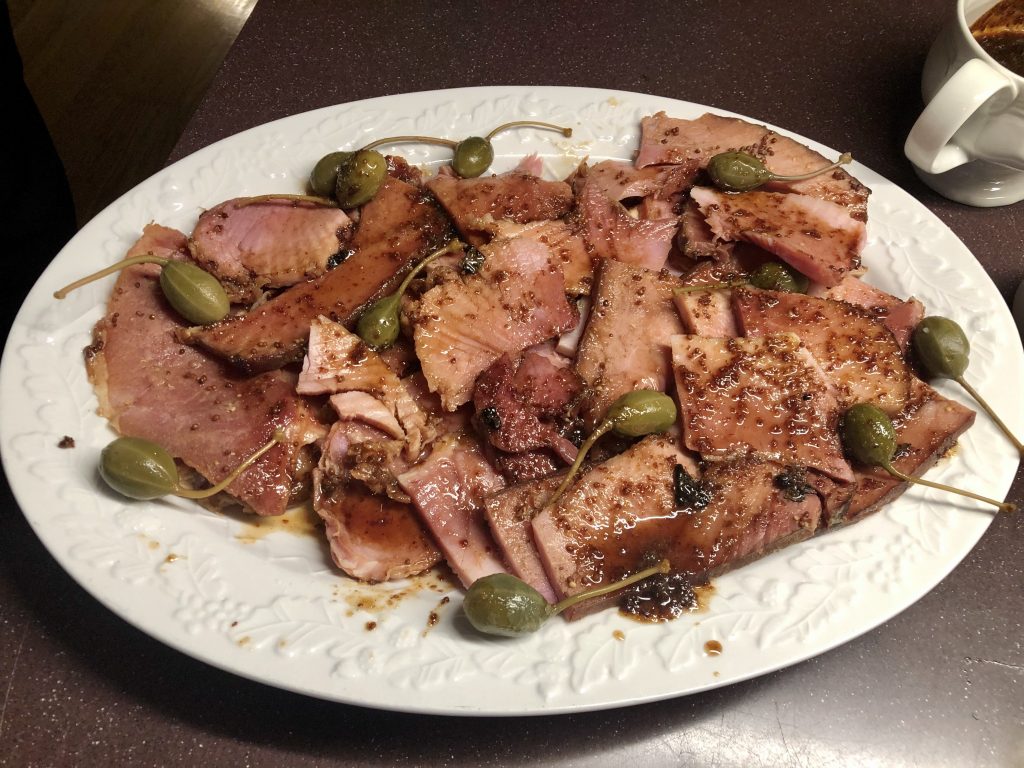
Ham with Maple Syrup Glaze
The ham went perfectly with the casserole. This ham was approximately 11 lbs. It was hard to find a spiral this time of the year. Not yet holiday season.
Pre-heat oven to 300 degrees. Place ham in a roasting pan and pour about 1 cup of good apple cider in the pan. Cover with aluminum foil and bake for 1 hour and 40 minutes.
While cooking, make the glaze. It takes no time. 1/2 cup maple syrup, 1/2 cup dark brown sugar, 2 tbsps of grain Dijon mustard, 1/2 tsp. ground cinnamon, 1/4 tsp. ground nutmeg. Mix all ingredients in a saucepan over low to medium heat and simmer for 2 minutes. Set aside.
When ham is heated through, remove the aluminum foil and brush all the glaze between the spiral layers. You want the ham covered with glaze. Raise the oven temperature to 400 degrees and cook uncovered until the glaze is caramelized. Let it rest for 10 minutes if you are eating it that day. I cooked mine on Friday evening and covered it well without slicing it. On Sunday the ham was taken out in the morning so as to get it to room temperature and I made another batch of the glaze so as to drizzle it over the ham.
The Breakfast Casserole
This casserole is made the night before. Then, place in refrigerator.
24 ounces frozen shredded hash brown potatoes
salt and pepper
12 eggs
2 cups half and half
1 tsp season salt (or just salt)
1 1/2 cups cheddar cheese grated
1 1/2 cups pepper jack cheese grated
2 cups of chopped ham or your prefer meat. I used sausage with sage.
Grease a 9 x 13 inch pan. Add the frozen and shredded hash brown potatoes at the bottom of the pan. Pat them down. Sprinkle with salt and pepper.
In a large bowl, whisk eggs together. Add half and half, season salt, cheddar cheese, pepper jack and chopped meat. Please note that if you are using sausage, it should be cooked and crumbled beforehand.
Pour over the top of the frozen potatoes. Cover with foil and refrigerate overnight.
Bake uncovered at 350 degrees for 90 minutes. Let it rest for 10 minutes before serving.
I did take it out before the 90 minutes because it was ready. This casserole cuts very easily. It will not crumble. Perfect for a crowd.
We had gorgeous tomatoes with mozzarella and basil drizzled with a high grade balsamic. And for dessert a floating island topped with berries including my own figs. As it happens I forgot to take those photos. Take it from me…..delicious.
We all had an egg-cellent time!!
Comments Off on Brunch, Breakfast Casserole, Ham, Mill Pond Garden, Recipes, Homemade, Tried and True, Delaware Beaches, Southern Delaware, Recipes, Begged, Borrowed and Stolen
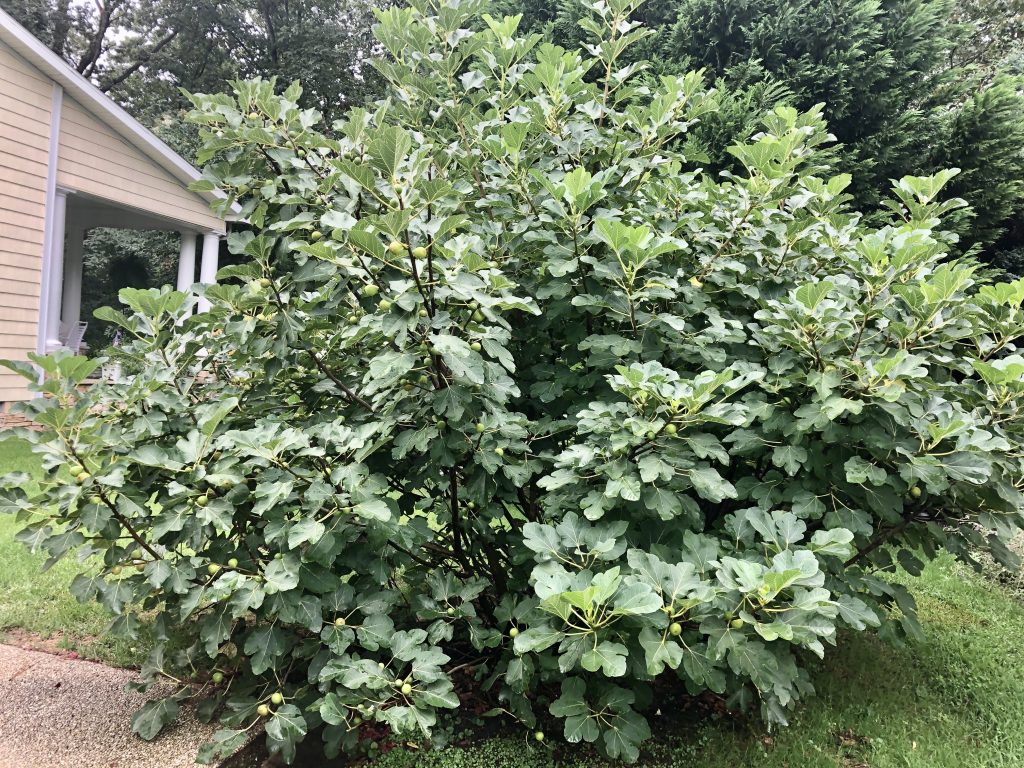
There is my fig tree. Isn’t that a beauty? Once you see their leaves, you recognize them everywhere. Too bad they lose the leaves during the winter. They are so pretty.
My figs start ripening in September and once they start they seem to do it quickly. So my friends with Italian ancestry always are there to help me out in the consumption of this delicious fruit.
I picked those figs a couple of days ago. Wait until you see the recipe. If I must say so myself, it turned out so well.
My love of figs started over 20 years ago. In Southern Delaware there are plenty of us with fig trees. I know where they are. Shhhhhh, a secret!!
I love them fresh the best. They are just so sweet.
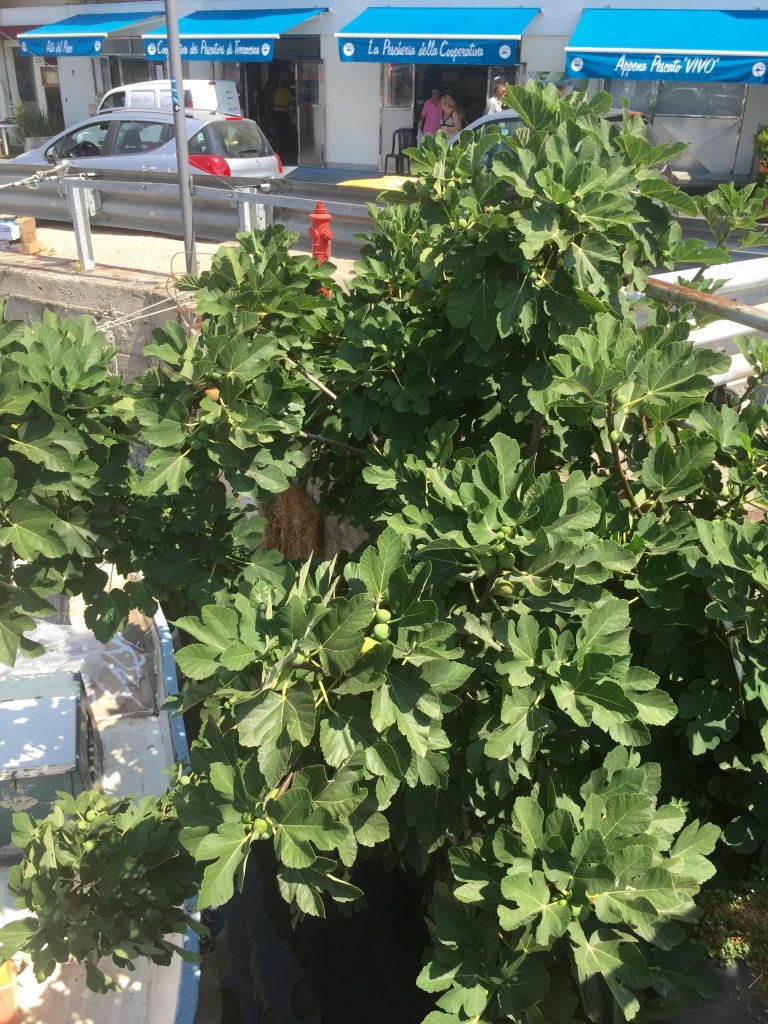
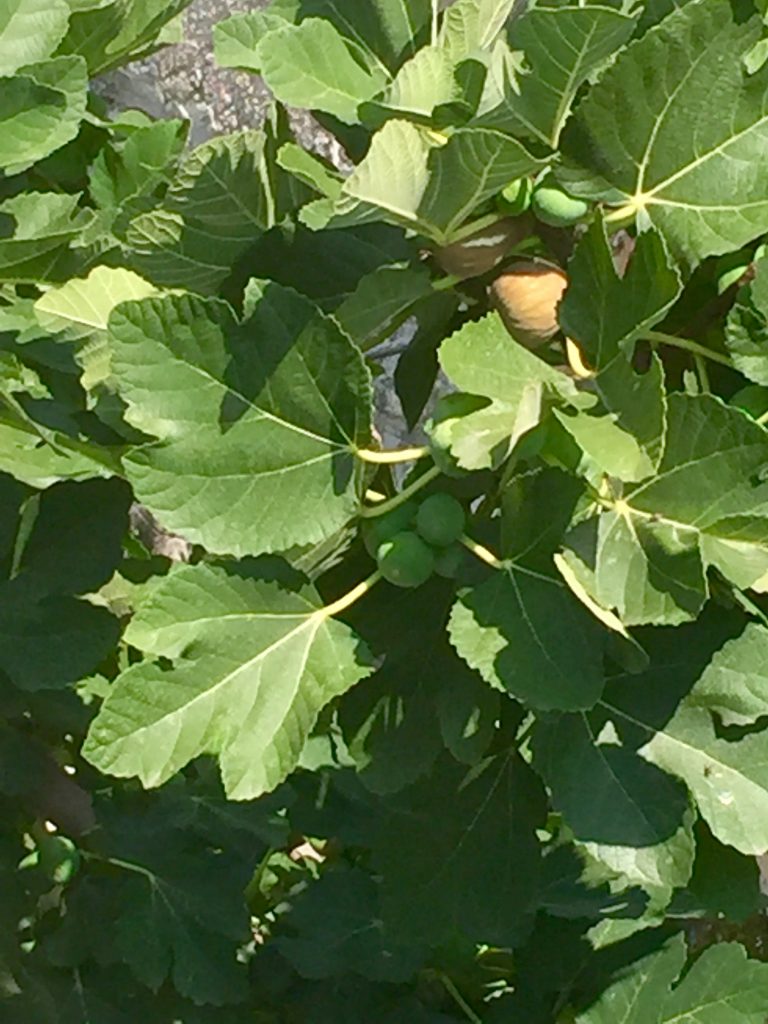
A few years ago I went with friends to Italy. In the town of Terracina which is to the southeast of Rome and a vacation spot for locals I immediately spotted one growing on the side of the street. Check it out.
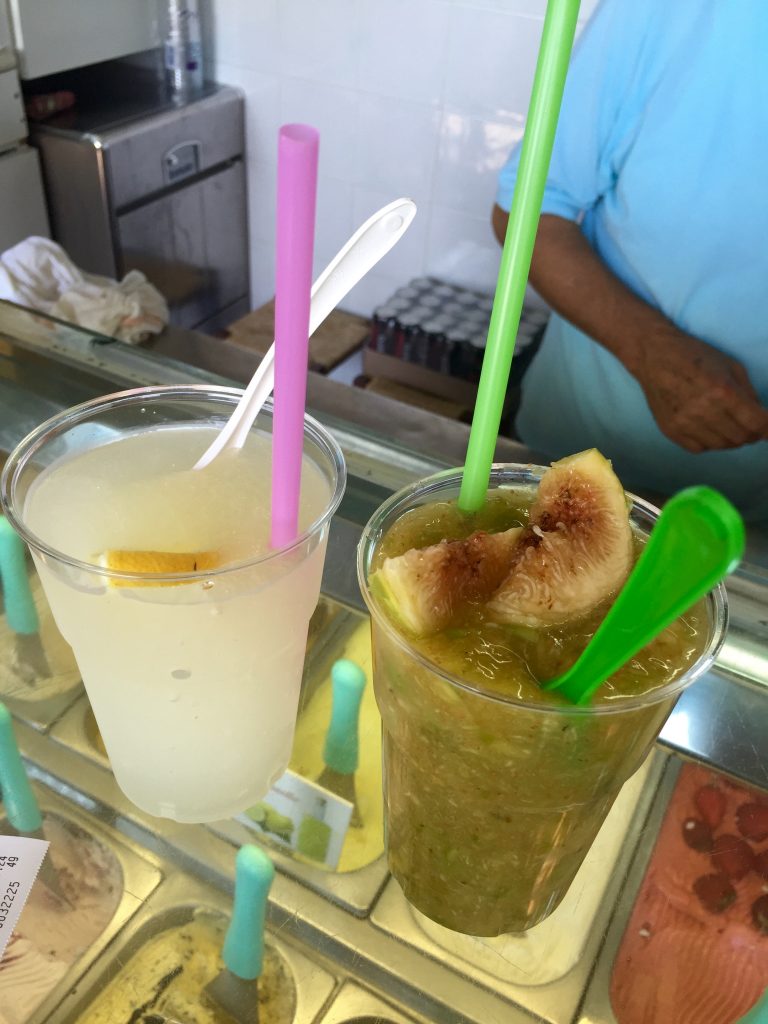
Of course I had some. They were there for the taking. In the Island of Capri I had a Fig Smoothie. Loaded with figs and very refreshing during hot weather.
On the search put Fig Stack. The recipe is very easy. Last night I decided to make the recipe again and here it goes.
A couple of green tomatoes (or as green as you can get them this time of the year)
A couple of ears of corn
4 slices of thin bacon cut in half
Corn starch
Salt
Pepper
Butter
Honey
2 cups or more of figs cut in half (I like a lot of them)
Balsamic reduction (you can make your own or buy commercial one)
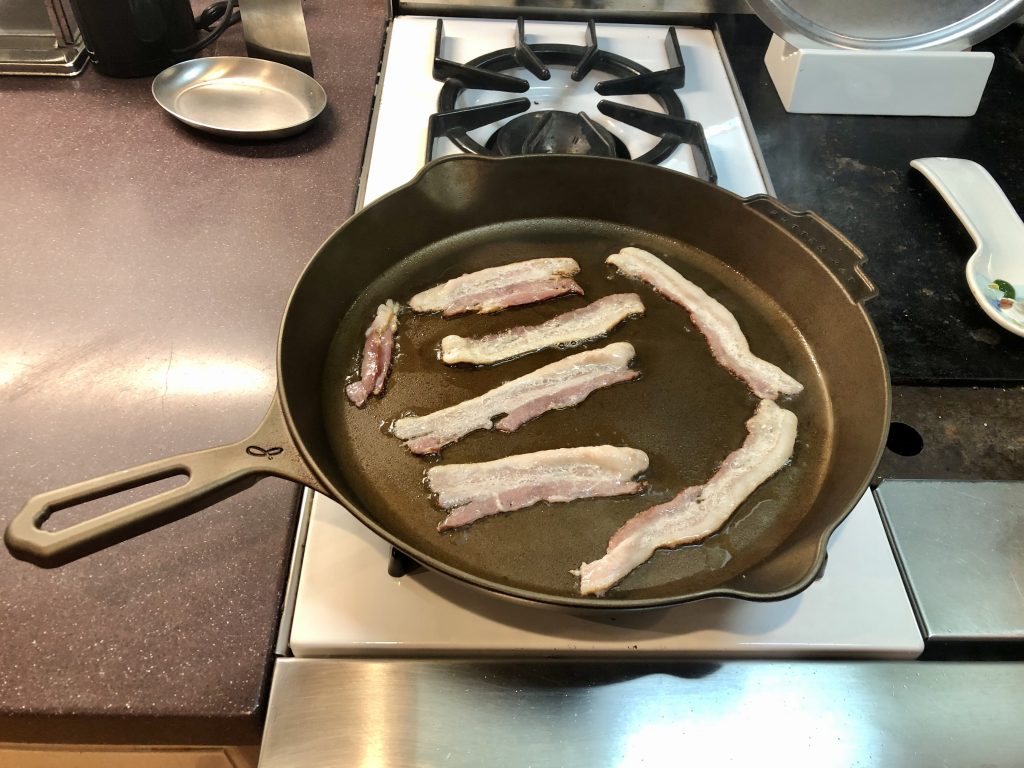
Cook the bacon in a large frying pan. Place on paper towels. Keep the drippings.
Cut the corn off the cob. Set aside.
Cut the two green tomatoes in slices. This recipe served 2. You need to have 3 slices for each person.
Get a plastic bag and put about 1 1/2 cups of Corn starch. Season with salt and pepper. Place tomatoes in the bag and shake gently to coat.
Heat bacon drippings and add some vegetable oil. You do not need a huge amount of oil. Fry the tomatoes, turning them over once. You want them to have a nice honey color. Place on paper towels.
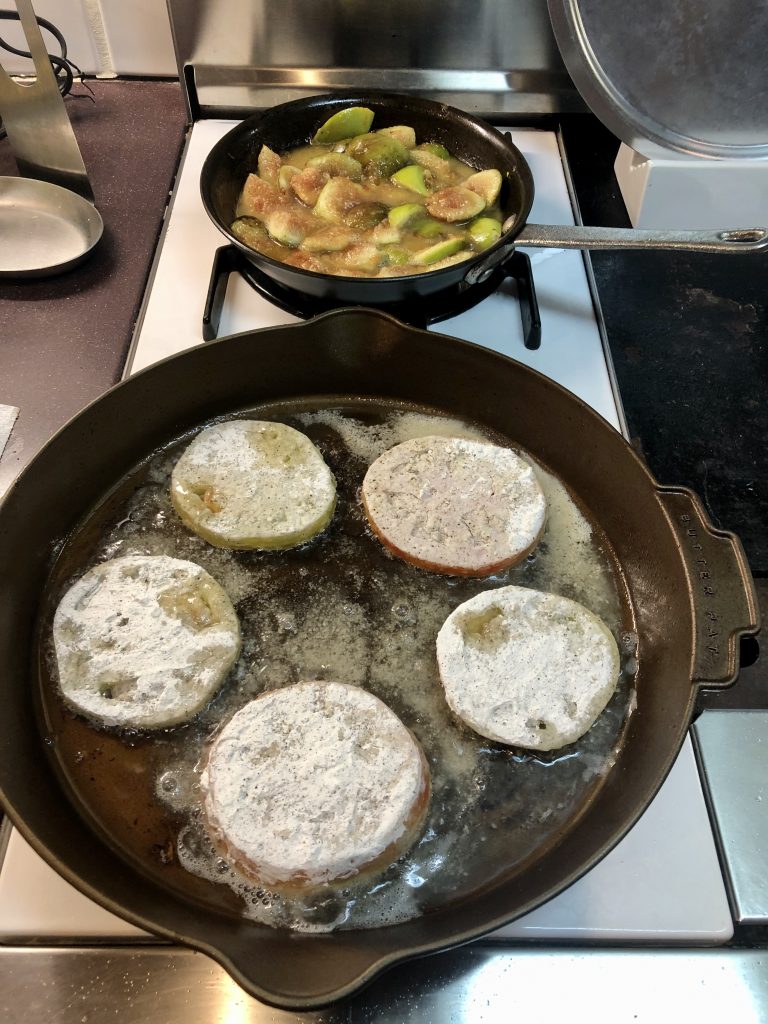
In a small frying pan put a little bit of butter and cook the corn for a few minutes. Take them out and put in a bowl.
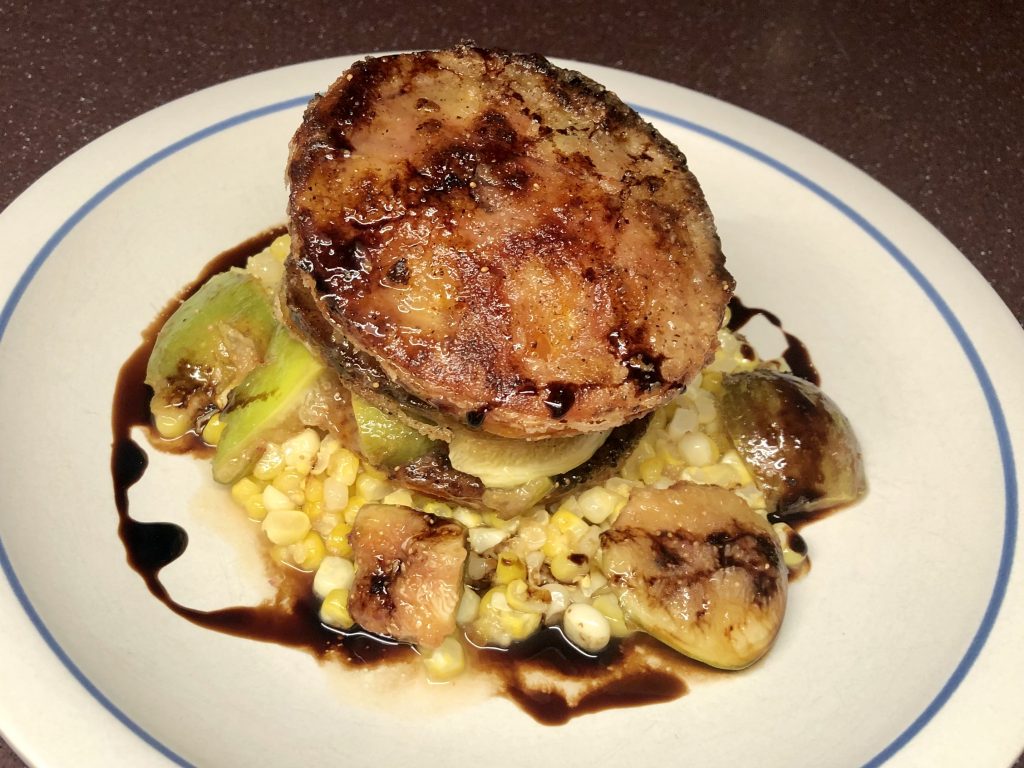
In the same pan put another tablespoon of butter and add the figs. You want them to cook some but not to let them get mushy. Add about a tablespoon of honey or even a bit more. Check the photo above. The figs are in the back burner after the cooking process.
Get two pretty plates to start making the Stack. First put corn on the plate. Spread it a bit in order to place the first fried tomato. Then 2 pieces of bacon, then spoon figs with juice on. It can drip to the sides. That adds to the allure of the dish. Repeat the process, finishing with the third fried green tomato on the top. Spoon figs around the corn. The final touch is a drizzle of the reduction of balsamic vinegar. Yes, I did make this reduction some months ago.
Voila!! This is Fig, Fried Green Tomato Stack. This dish has the texture, the tang, the finish; yes, the everything. It is totally delicious and you just need a nice cup of wine and enjoy!!
Comments Off on Fig Fried Green Tomato Stack, Recipe, Time for Figs, Southern Delaware, Delaware Beaches, SoDel
I started putting recipes under the heading of Meatless Monday some time ago. No, I did not start this movement. But in 2003 Sid Lerner, the Founder of The Monday Campaigns, in association with the Johns Hopkins Center for a Livable Future did.
It is a way to give us one day of healthy eating where you can leave all meats behind. It is for Monday since we all see it as the beginning of a new week. Basically, you can do it any time.
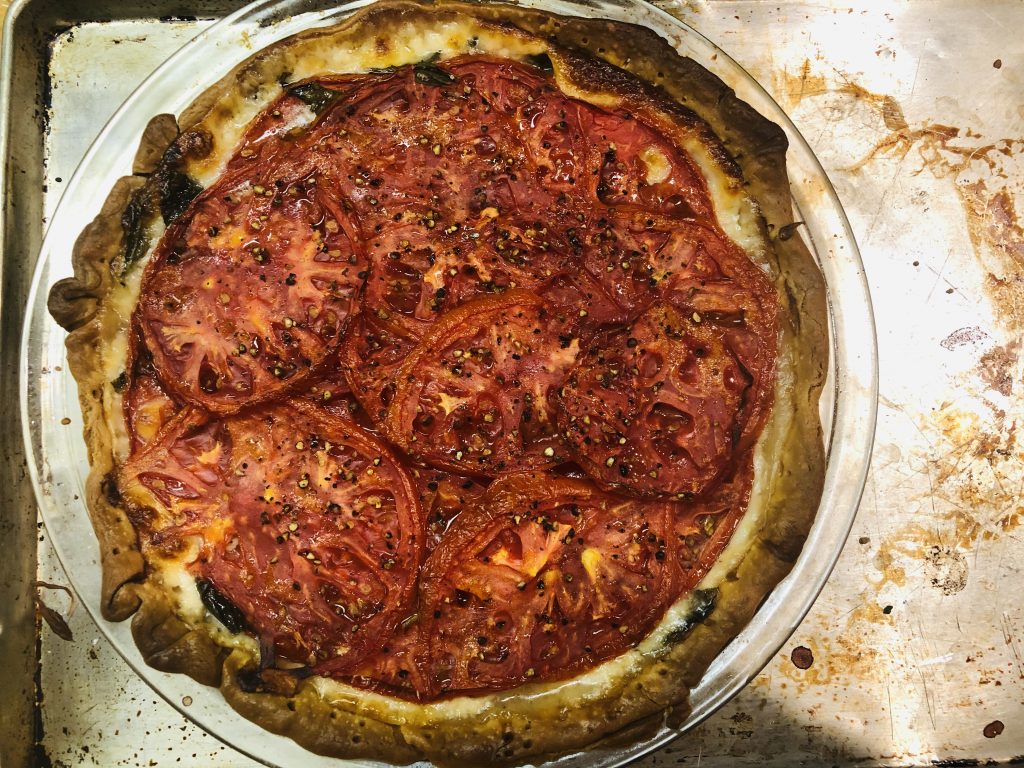
Sharing the Fresh Tomato Tart recipe because at this time of the year the tomatoes are amazing. Delaware is known for its tomatoes.
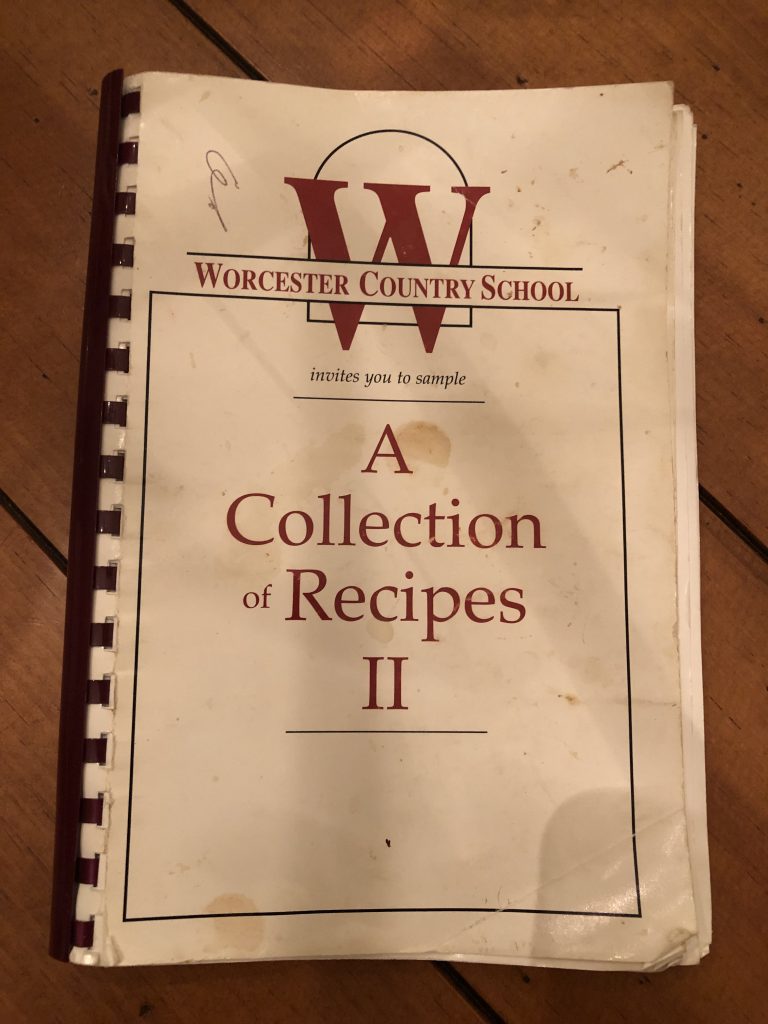
The recipe was given by the late Debbie Meinhardt from Ocean City, Maryland. At the time, I was the Chairperson for a cookbook from the Worcester Country School, now known as the Worcester Preparatory School, located in Berlin, Maryland.
The Title was A Collection of Recipes II. It was back in 1997. I use the book all the time. The recipes are good and best of all is that the contributors were all friends.
Fresh Tomato Tart
1 refrigerated pie crust (1/2 of a 15 ounce package)
2 cups (8 ounces) shredded mozzarella cheese
1 cup of chopped fresh basil
3 medium sized ripe tomatoes, peeled and cut into 1/2″ slices
1 1/2 tablespoons olive oil
1/4 teaspoon salt
1/4 teaspoon pepper
Pie: Crust:
Fit pie crust into a 10 inch tart pan or pie pan according to package directions. Trim excess pastry along edges.
Generously prick bottom and sides of pastry with a fork.
Bake at 400 degrees for 5 minutes. Cool.
Filling:
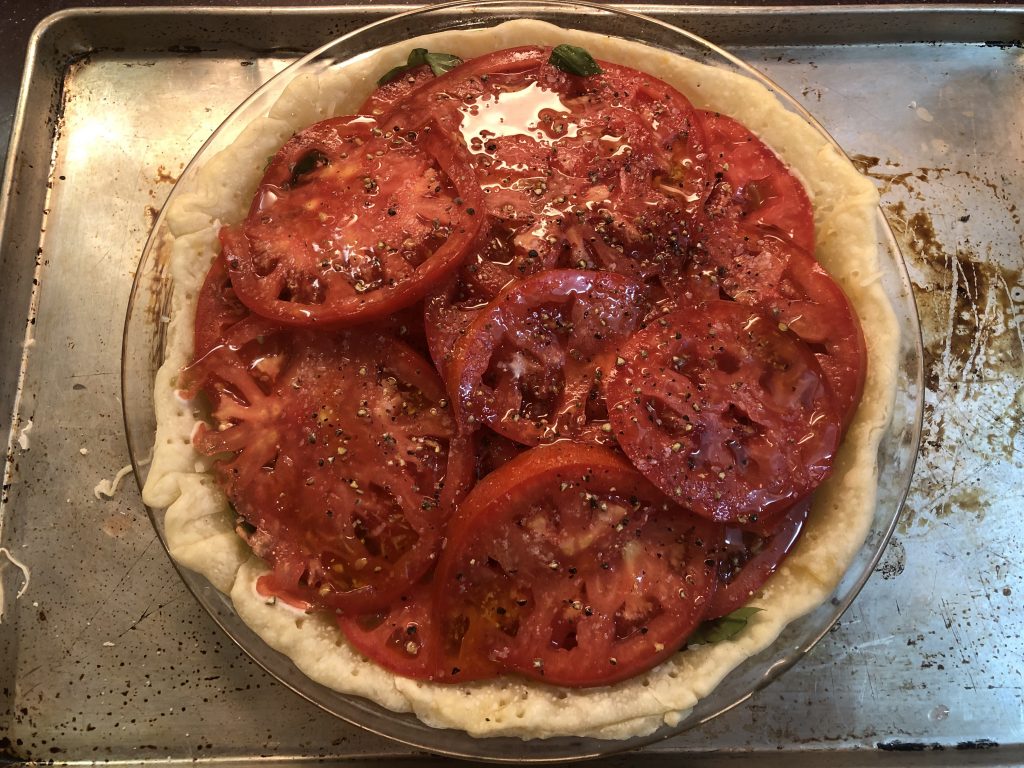
Sprinkle cheese evenly into pastry shell and top with basil. Leave a few leaves for garnish.
Arrange tomato slices on top. I used 2 big tomatoes. Brush or sprinkle liberally with olive oil and also sprinkle with salt and pepper.
Place tart on a baking sheet. Place baking sheet on lower rack of oven.
Bake for about 40 minutes.
Remove from oven. Top with leftover basil as a garnish. Let it stand for 5 minutes before serving.
Just assembled and ready for the oven.
Out of the oven, ready to eat after garnishing it.
Enjoy!!
Comments Off on Meatless Monday, Fresh Tomato Tart, Recipe, Easy, Healthy Eating, Delaware Beaches, Southern Delaware
In 1997 my children went to Worcester Country School in Berlin, MD. Since then the school is now known as Worcester Preparatory School.
Over the years a lot of parents were involved in the school and I was one of them. Book fairs, galas, Christmas Programs, Reading Programs, Teacher Appreciation Luncheons, etc. etc.
Years before my time the school had published a cookbook called A Collection of Recipes. It was as I mentioned above 1997 and the Parents Association decided to do another cookbook called A Collection of Recipes II.
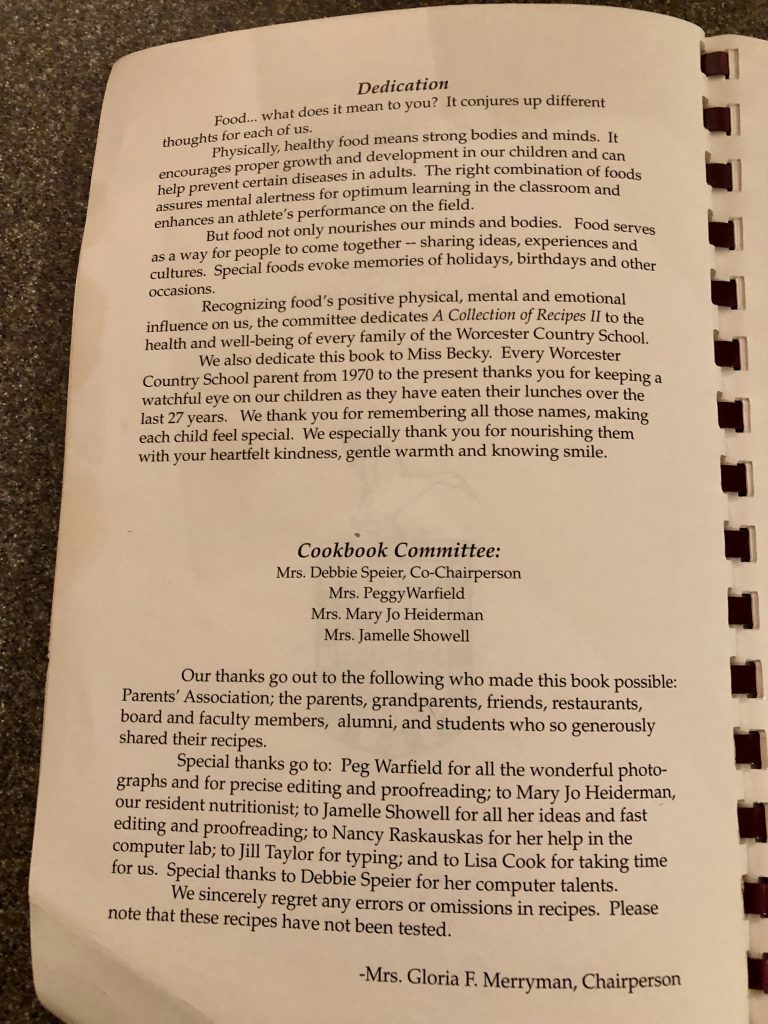
As you can see the book has been used over the years. I was the Chairperson on this journey that took many months with parents giving us their best recipes. It took a school not a village to complete this project.
I don’t think the book is available anymore. Parents supported this book and it was a great success. The book is probably in your cabinet, but I keep my handy because the recipes are really good. I still feel strong about those words in the dedication that said “But food not only nourishes our minds and bodies. Food serves as a way for people to come together — sharing ideas, experiences and cultures”.
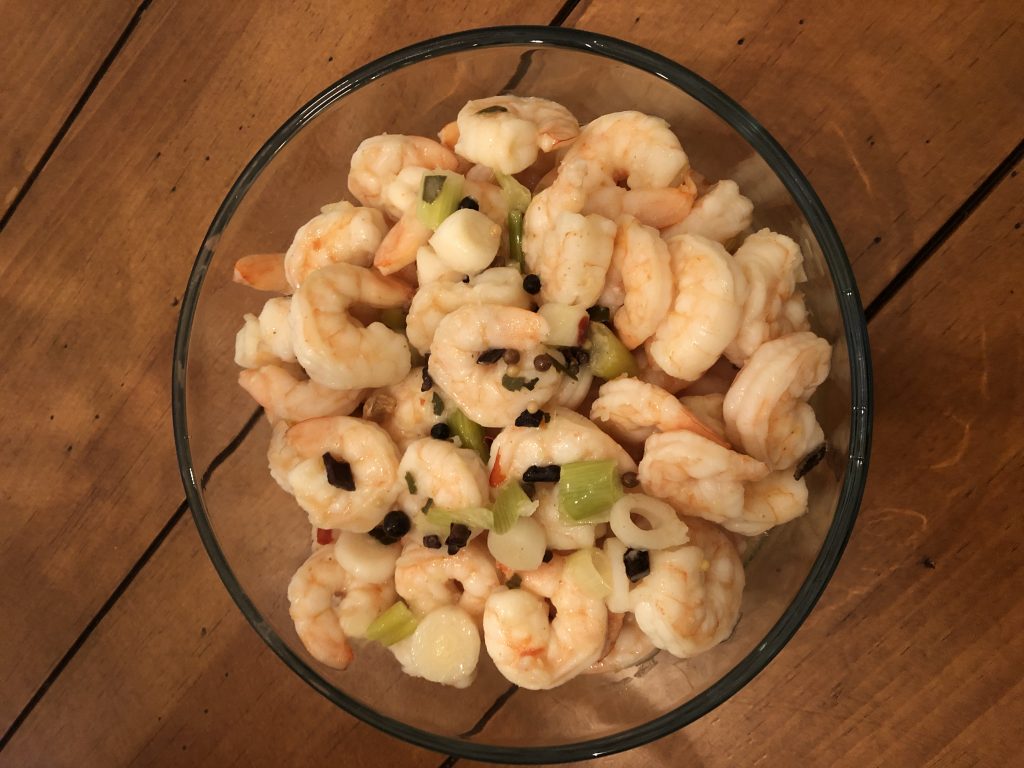
Tonight I made a recipe from this book called Pickled Shrimp. I was invited to a friend’s house. Pickled Shrimp is an easy recipe and it is usually liked by everyone. You can serve it year-round.
1 pound medium shrimp, uncooked
1 tablespoon pickling spices
1 tablespoon Dijon style mustard
1 teaspoon prepared horseradish
1/4 cup vegetable oil
1/2 teaspoon salt
1/4 teaspoon celery salt
1/2 white wine vinegar
2 green onions sliced, including the greens
Pull shrimp from shells. Discard shells. I bought shrimp already peeled and I just pulled the tails out. Make sure if you buy frozen shrimp to defrost them.
In a 2-quart saucepan, cover shrimp and pickling spices with water. Bring to a boil; simmer over medium heat about 2 minutes. Strain water leaving spices on shrimp. Set aside.
In a small bowl combine mustard, horseradish, oil, salt, celery salt, vinegar and onions. Pour over drained shrimp. Cover and refrigerate 6 hours or overnight. The longer you marinate it the better they taste. Pour in a pretty bowl with the sauce and enjoy. Serve cold.
This recipe could easily be doubled, as well.
Comments Off on Pickled Shrimp, Recipe, Easy, A Collection of Recipes II, The Art of Wining and Dining, Southern Delaware, Delaware Beaches
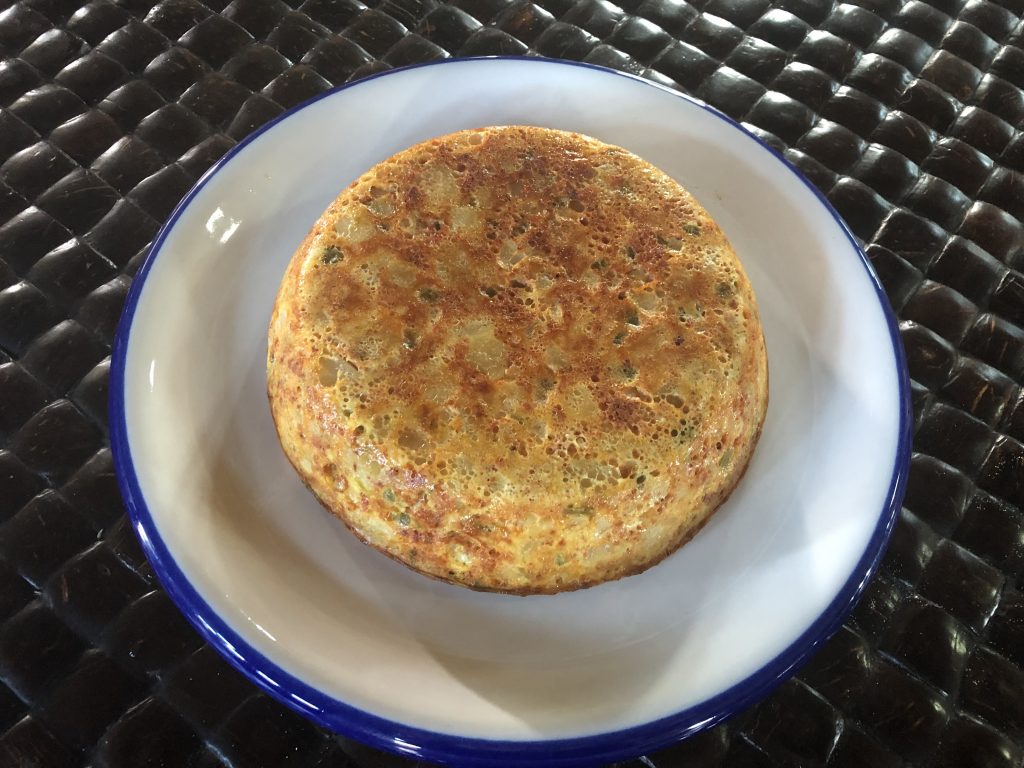
It was early in the morning in the Island of Culebra and I was coming back to Rehoboth Beach, Delaware. The beautiful sunrise on this island is breathtaking and so is the sunset. We did have an advantage view.
It was over a week of swimming, cooking, and eating. A few spirits too. This recipe that I will share with you is of the Spanish Tortilla. In Spain every time you visit a tasca you will find the tortilla in their tapas menu. In different regions the Spanish Tortilla is prepared in different ways. Some tortillas have onions and potatoes only. Some are more dry than others. Either way it is a simple dish, one that works in all cases. Breakfast, lunch, dinner or appetizers.
You probably have the ingredients in your refrigerator.
This recipe was given to me without anything written.
Pre-heat oven at 350 degrees.
Peel 2 large potatoes and cut in small chunks.
1 medium onion, chopped.
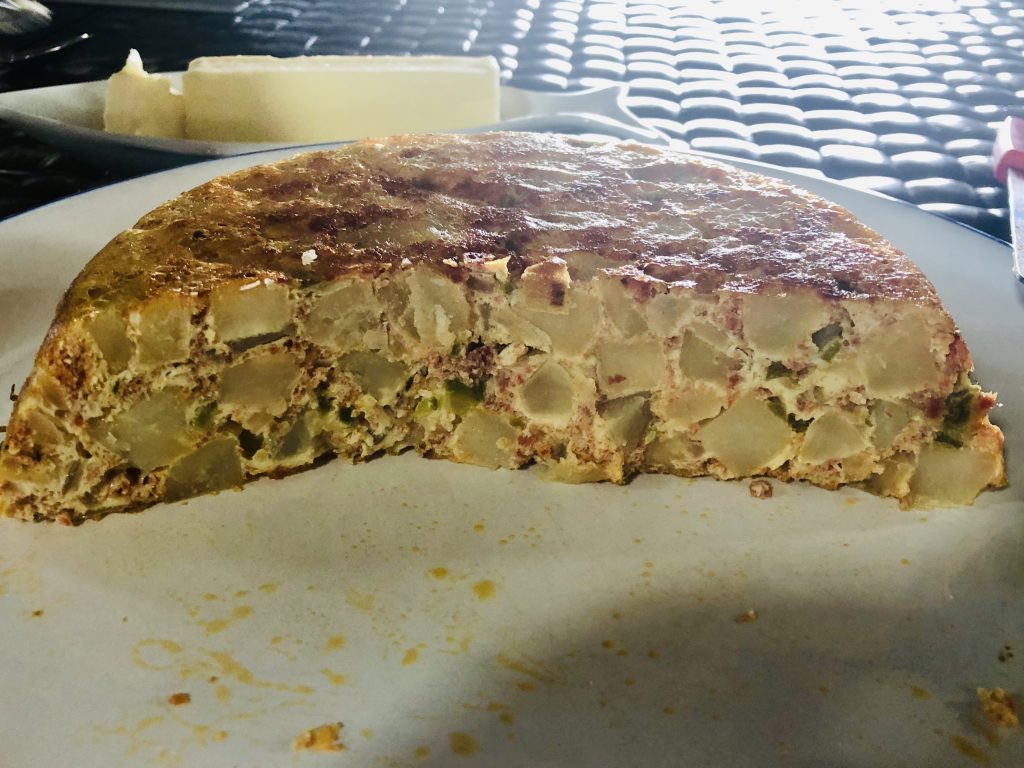
In a small oven proof skillet put a little bit of olive oil and sautee the potatoes and onions until just soft, seasoning to your taste. Then, beat 4 to 5 eggs which you have added a bit of salt. Pour over the potatoes and onions and cook over low to medium heat until the borders are done.
Put skillet in the oven for 20 minutes.
Invert on a platter and this is how it should look.
To this Spanish Tortilla we added crumbled chorizo sausage. Not a lot just a bit. You don’t want to overtake the tortilla.
Enjoy. Meatless Monday is a global organization trying to inform people that eating healthy is the way to go even if it is just on Mondays.
Check my Facebook Page AboutMyBeaches. Thanks.
Comments Off on Meatless Monday, Spanish Tortilla, Tortilla Espanola, Recipe, Easy, Southern Delaware, Delaware Beaches


Comments Off on Comfort Food, Cider Beef, Smashed Cheddar Potatoes, Recipe, Rehoboth Beach, Delaware, Delaware Beaches, Soups and Stews, It’s Chilly Out There!!